Connect Mailchimp to your Leadpages account to send leads directly to any of your audiences (lists).Your integration can be connected in two different ways, depending on whether you use our custom form widget or our classic form widget.
Follow the instructions below on how to set up the integration based on your widget type.
The fine print
- Mailchimp can be connected to our workflows feature, so that you can seamlessly connect custom forms across Leadpages assets to your Mailchimp Audience. Learn more about workflows here.
- Mailchimp can also be integrated with our classic form widget, though it’s a different setup process.
Integrate Mailchimp with workflows
In the left-hand navigation on your account dashboard, under Assets, click the drop-down arrow next to Integrations. Select Core.
You will be redirected to a new tab or window to enter your Mailchimp login information.
Mailchimp will request your authorization for Leadpages to read and share data between our platform and your Mailchimp account. This step is required for using workflows with Mailchimp. Click Allow.
You will see a brief notification of a successful connection. You can confirm that your Mailchimp account is connected by reviewing your Core integrations menu. A green “Connected” icon will accompany the Mailchimp entry.
Send leads to Mailchimp with workflows
With workflows, you can send your opt-in data to your Mailchimp Audience to add new leads or edit existing ones with the action event Add/Update Contact.
After choosing your lead collection source, under step 2, Choose Destination, you can select your Mailchimp Audience in the drop-down beneath Select List.
You can also connect existing tags created in Mailchimp, so your leads from a specific set of assets will be tagged when they enter your Mailchimp audience.
Integrate Mailchimp with classic integrations
You can also integrate Mailchimp through our Classic integrations menu, if you would like to use our classic form widget. You’ll need Manager-level permissions or higher in Mailchimp to connect via API key.
Generate and copy an API key
Our integration leverages Mailchimp’s API, so you’ll need a key to connect your account. Mailchimp has a detailed guide on how to generate a new API key, available here: About API Keys.
Once you generate or find the API key, copy it and navigate back to your Leadpages account.
Add your API key to Leadpages
Before sending leads to Mailchimp, you'll need to add your API key to Leadpages to connect your Mailchimp account to your Leadpages account. Follow our guide here.
Send leads to Mailchimp with the classic form widget
Open the integration settings for your page, site, pop-up, or alert bar, and select the audience where you would like contacts to end up.
Follow these steps to choose an integration as the destination for your leads.
Add tags
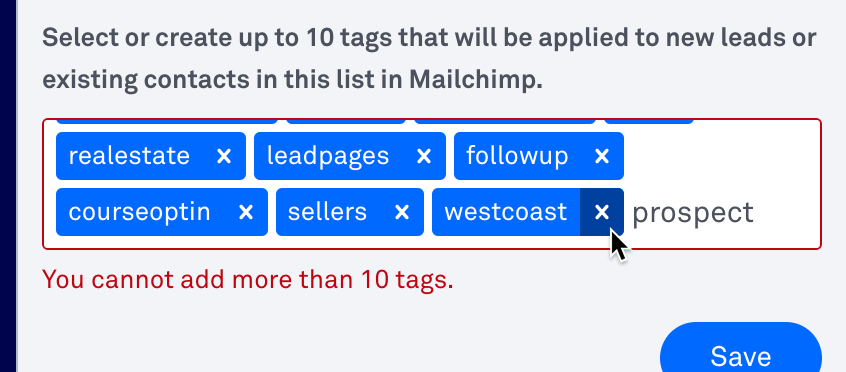
In addition to sending your leads to a Mailchimp audience, you can also apply Mailchimp tags to those subscribers using the Leadpages Mailchimp integration.
Simply start typing your tag name and click "Create "[tag name]" or press the return/enter key on your keyboard. Click Save.
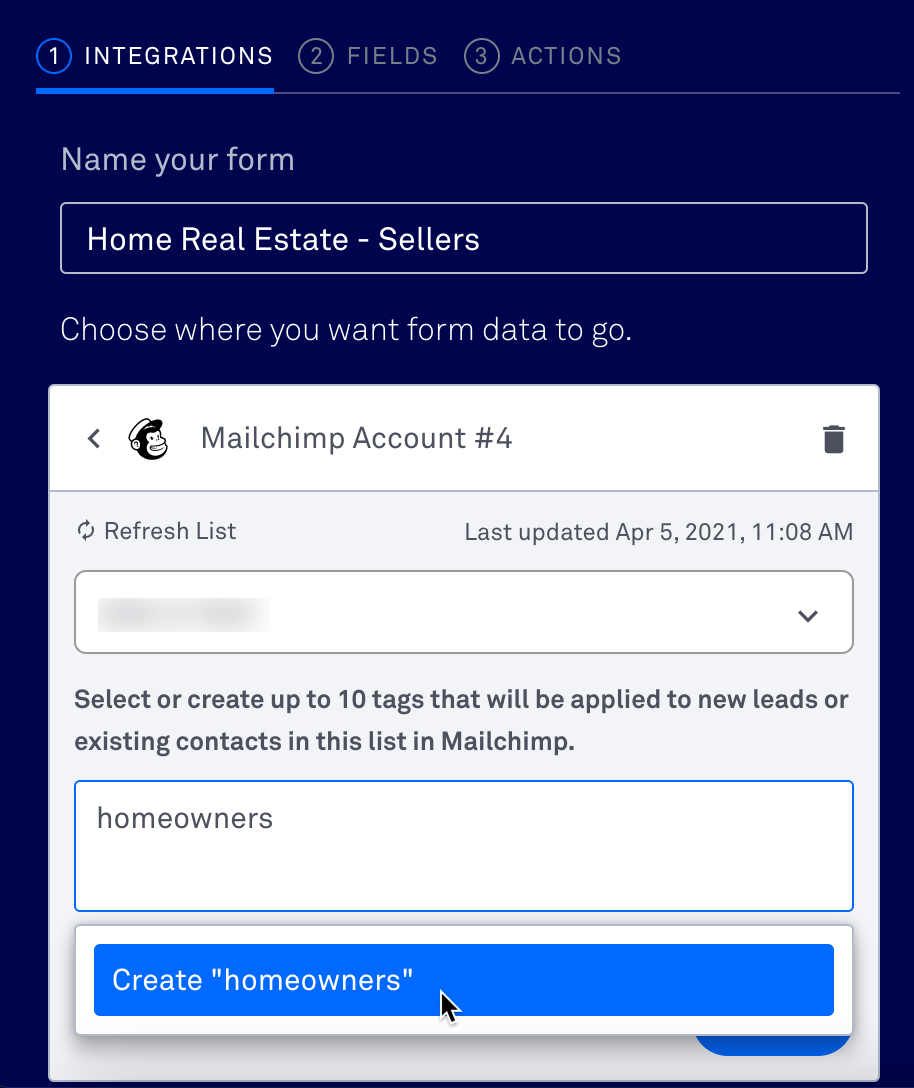
You can select up to 10 tags per Leadpages form with the Mailchimp integration. To remove a tag, simply click the X next to it in the tag listing.
Define your fields
To collect information beyond an email address and name, you’ll need to set up additional fields within Mailchimp. There are a few ways to do this, which are covered here by Mailchimp: Manage Audience and Signup Form Fields.
After you configure your form within Mailchimp, you should see any additional fields appear so you can add them to your form within Leadpages (more information on adding custom fields to a form widget).
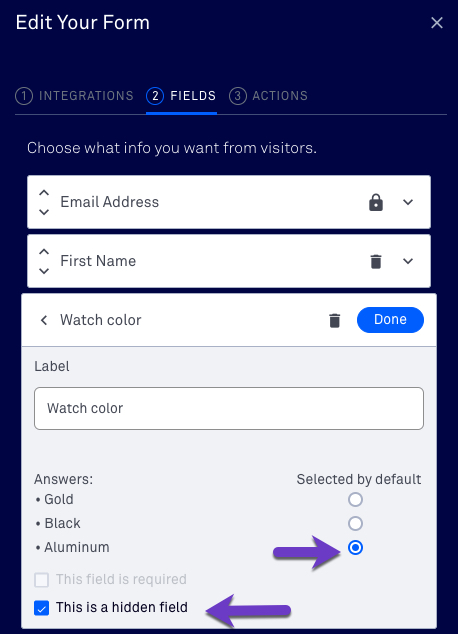
Use Groups
Our forms work with Mailchimp audiences that are segmented into groups. To let your subscribers select a group, be sure to add a Groups form field within Mailchimp. You can use a drop-down menu, checkboxes, or radio buttons as described here: Create a New Audience Group.
Another option is to add subscribers to a pre-selected group. To do so, set your group field to “Hidden”, then choose the default option. As an example, here’s a form for a watch giveaway page. You’ll notice a specific watch color is pre-selected, so any entry will get segmented into that Group in Mailchimp.
Configure double opt-in settings
Audiences in Mailchimp default to a double opt-in process, so any subscribers must confirm their subscription (via an email link) before they end up on your audience. Using double opt-in has many benefits, including protection against spam.
However, you can choose to disable the process when you integrate with Leadpages. If you'd like to bypass your subscribers having to confirm their opt-in, make sure that double opt-in is turned off in both Mailchimp and Leadpages.
Here’s how to toggle the setting:
Step-by-step
- Navigate to Integrations in the navigation menu on the left side of your account.
- Select Mailchimp.
- Toggle the "Double Opt-in" switch from "On" to "Off"

Troubleshooting tips and FAQs
Is there a way to enable Welcome Emails and subscriber notifications when using single opt-in?
Unfortunately, the way the single opt-in setting works, it’s not possible to turn those Mailchimp features on. However, there are a couple options you can consider:
- Instead of a Welcome Email, you can set up an automation for your audience. For instance, you could use one of Mailchimp’s audience activity automations. For additional guidance, check out Mailchimp’s tutorial: Add an Automation.
- While Mailchimp’s regular subscriber notifications won’t send, you can set up Lead Notifications instead. To learn how, check out: Receive Email Notifications for New Opt-Ins.
Someone has unsubscribed from my list in the past, but wants to opt back in. How can they re-subscribe?
After one of your subscribers has unsubscribed from your Mailchimp list, the only way for them to resubscribe to receive your marketing is via an opt-in email or form created within Mailchimp. They will not be resubscribed by simply opting in to a Leadpages form you have integrated with Mailchimp. This is a stipulation set by Mailchimp. Note: A Mailchimp form could be embedded on a Leadpages landing page or pop-up using the HTML widget.
Need more help?
You can always get in touch with our support team—just click Support in your Leadpages navigation menu, or submit a ticket ↗