The fine print
- While Stripe's testing mode is strictly for their product directly, rather than integrations like Leadpages, you can still test out your checkout widget within Leadpages. Learn more below ↘
- Shipping costs must be included in the price of the product you sell. We do not provide services for handling tax, shipping, or logistics involved with delivering physical products.
- Depending on the type of product, Leadpages may or may not be able to deliver it for you. Learn more below ↘
- The Leadpages checkout widget is compliant with SCA regulation. Learn more →
- Only one Stripe account can be connected to a single Leadpages account.
- Although the "Earnings" column of your analytics displays the United States Dollar sign, the earnings number will match your default currency of your Stripe account.
- Make note of our FAQ article on this widget.
Add a Checkout
To start selling your product, drag a Checkout from the widgets panel and place it on your page or pop-up. A basic form will appear, along with its settings sidebar.
Connect to Stripe
If it’s your first time using the Checkouts, click Connect Stripe Account in the left sidebar. Or, create a new account at https://dashboard.stripe.com/register if you’re not already using Stripe.
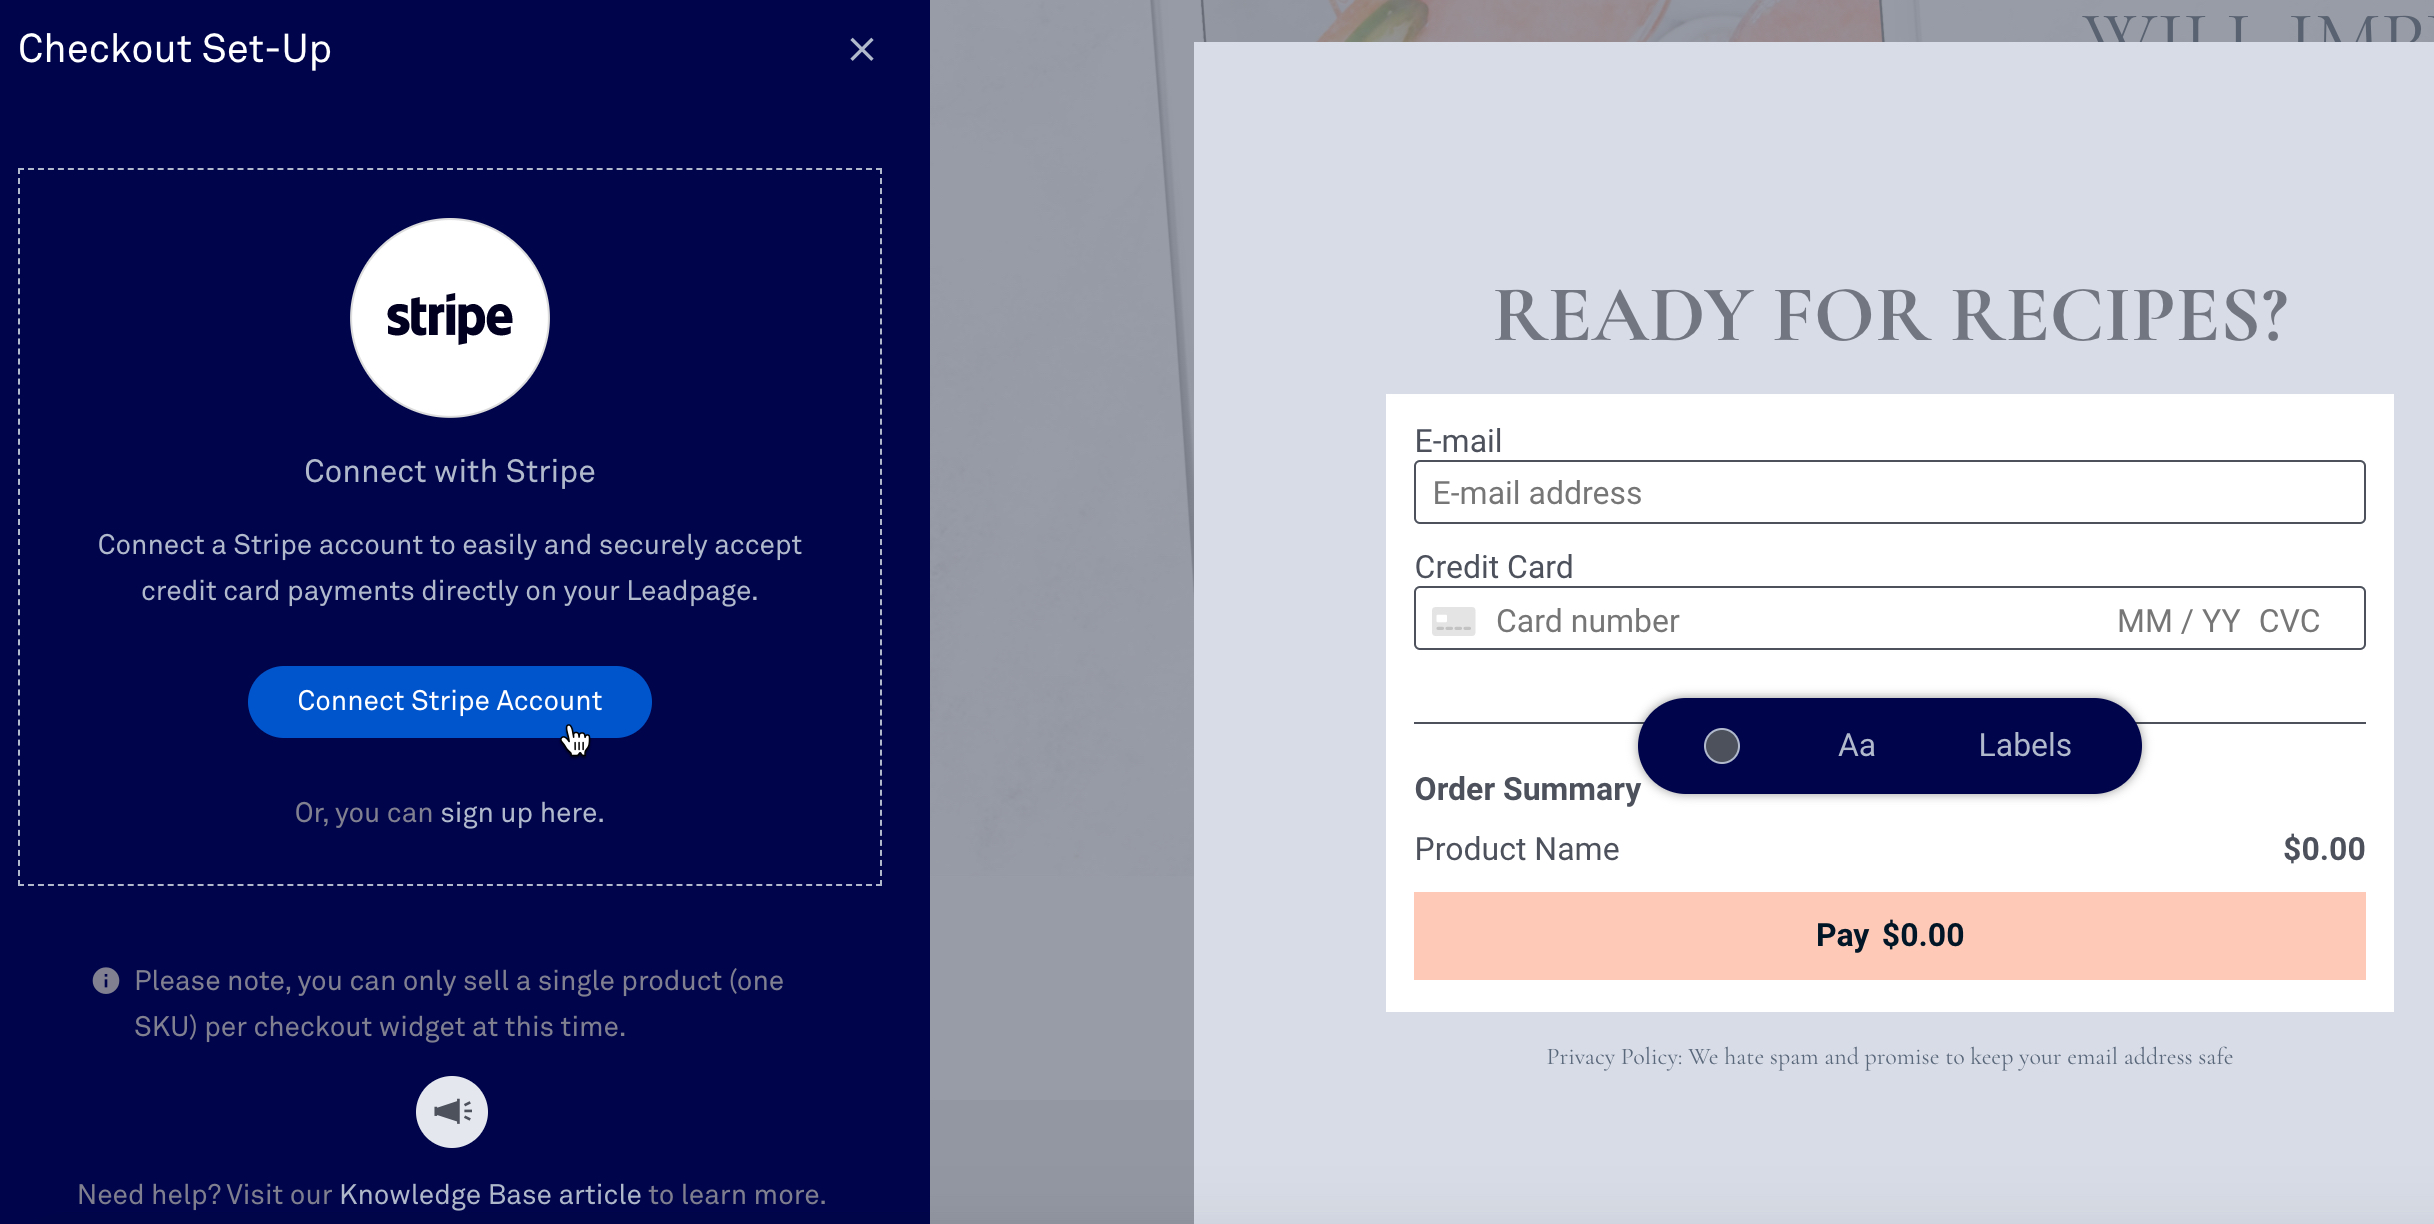
Sell a one time product
When you set up a Checkout, you’ll need to specify a product to sell. More specifically, each Checkout must have a product and a price, as shown below. First, you need to create your product and set a price inside of Stripe, before you add it to your checkout.
Click +Create Product in Stripe if you have yet to create your product in Stripe.
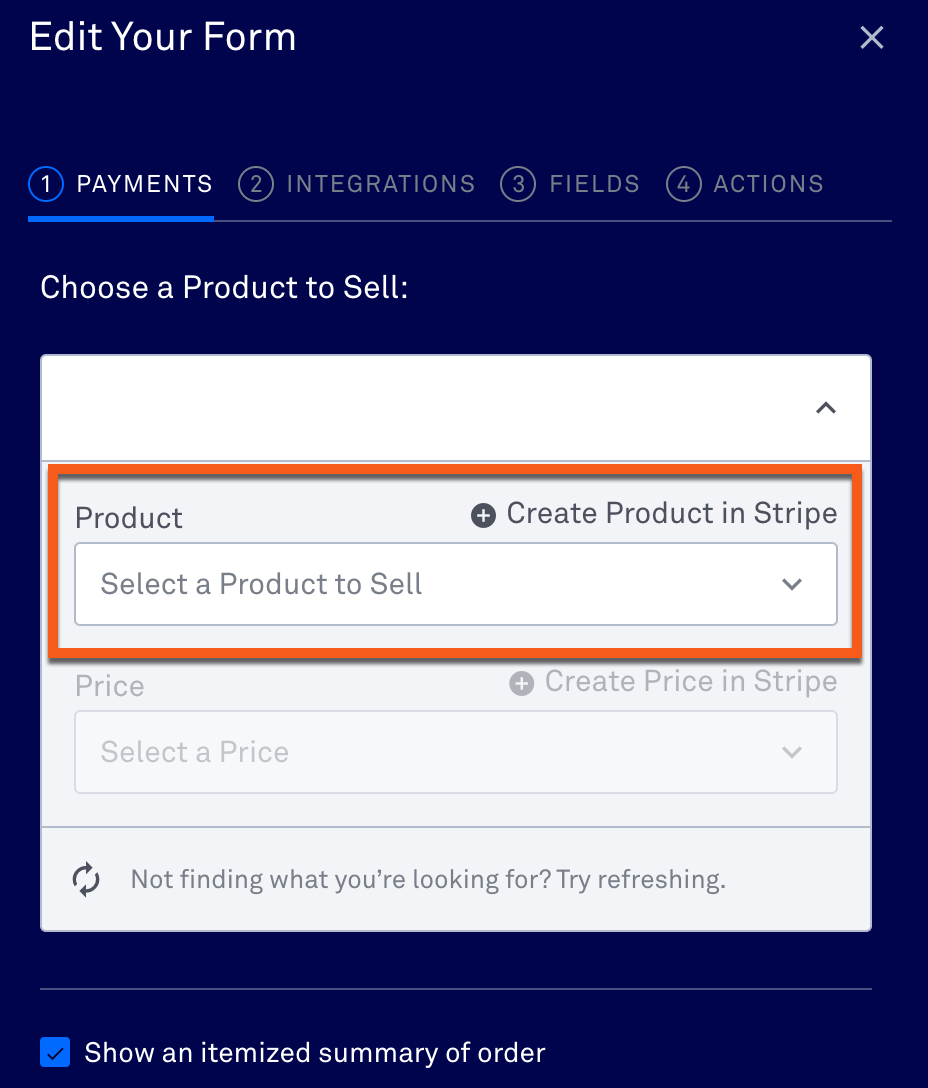
Add a product from Stripe
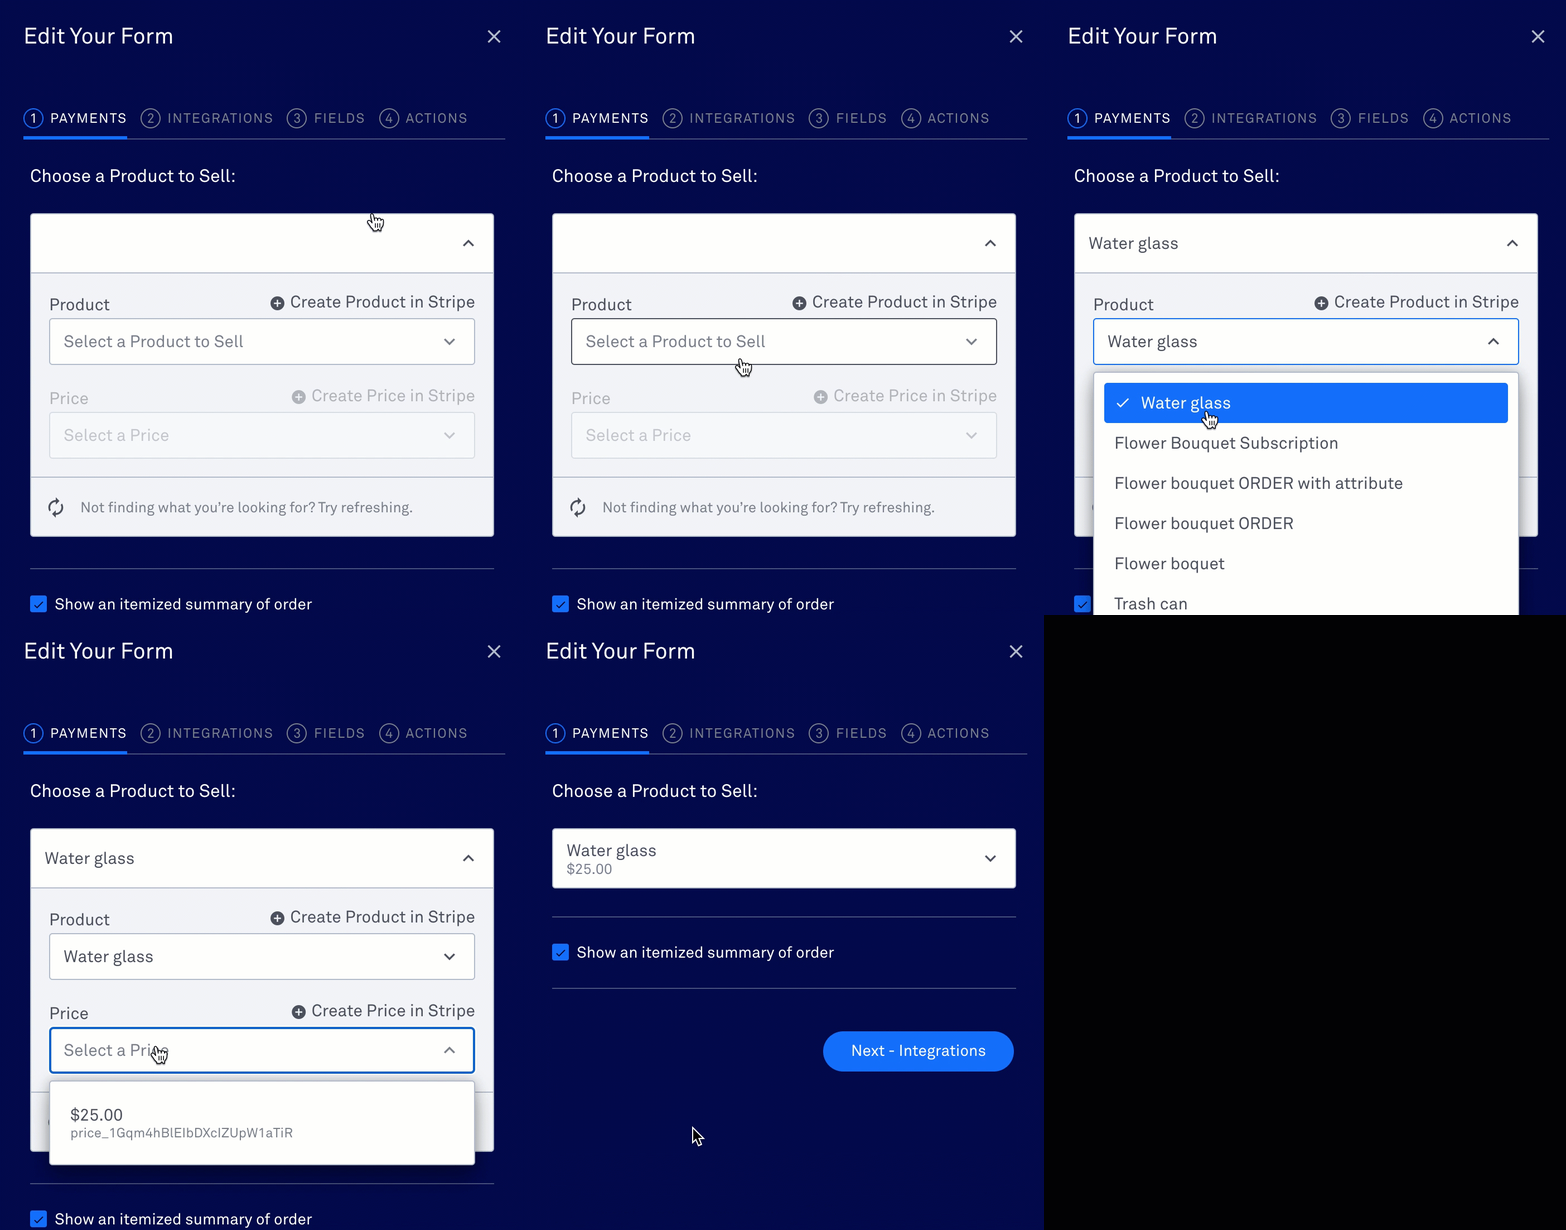
Once created in Stripe, here’s how to select your product and price in a Checkout’s settings:
- Click the form on your page or pop-up, and navigate to the “Payments” tab.
- Select your product and price from the drop-down menus.
Sell a recurring product
Create a new Stripe subscription
If you have yet to create a recurring product in Stripe, simply click +Create Product in Stripe and you’ll be taken directly to the place where you will create a product in Stripe. Select "Recurring" under "Pricing" to set up a subscription product.
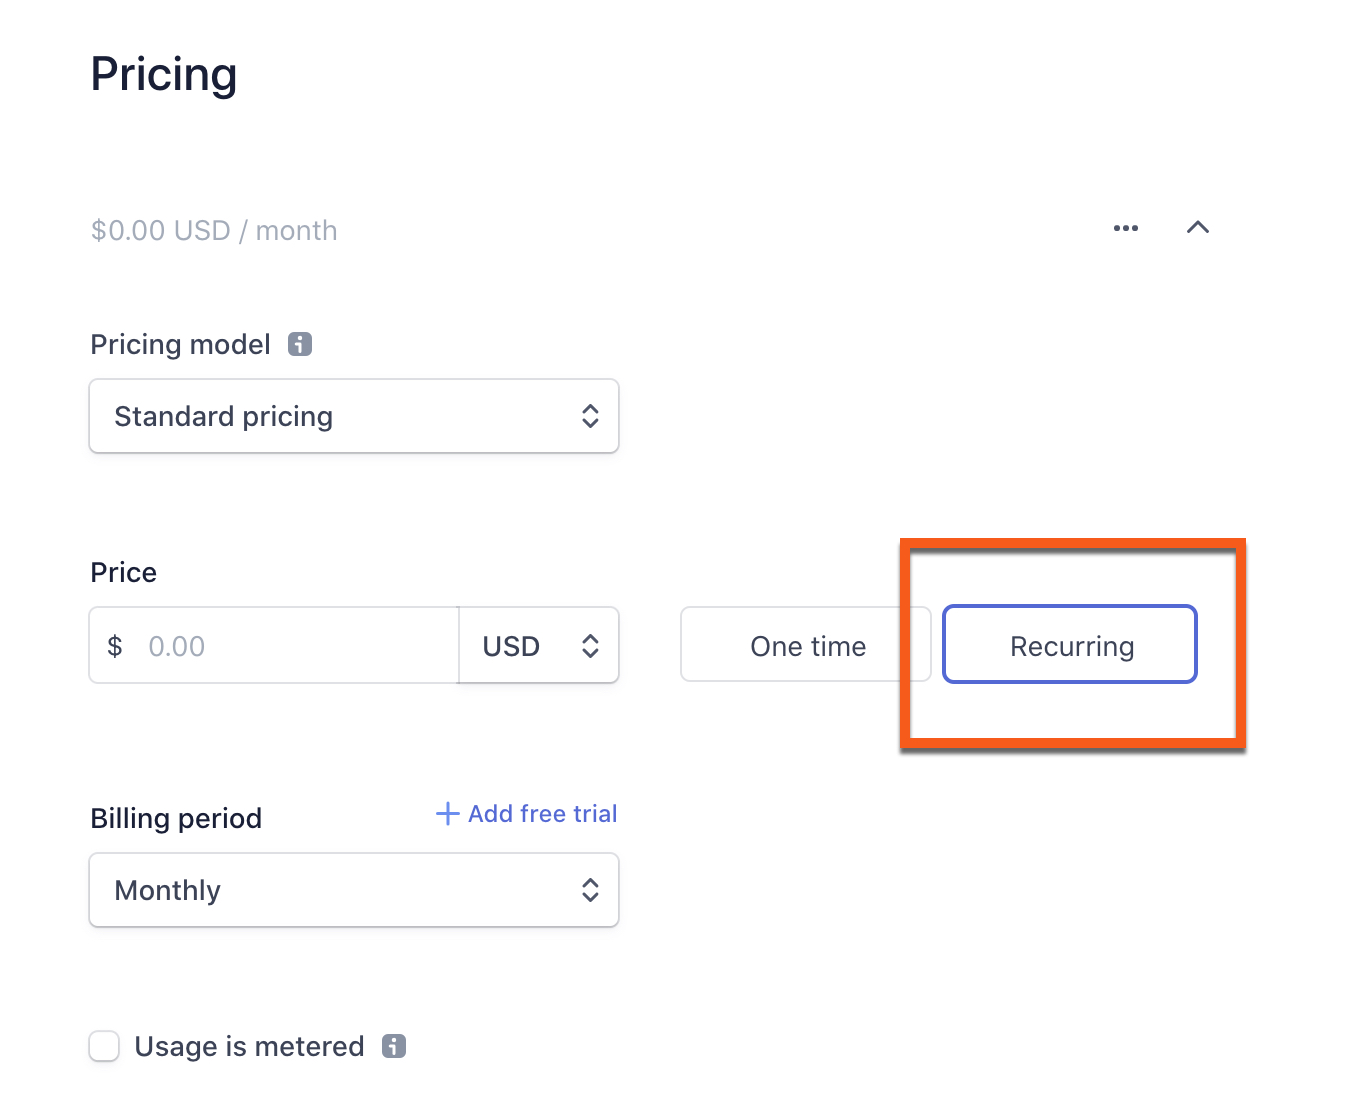
After creating a recurring product and price within Stripe, refresh your products in your Leadpages checkout widget and you’ll see your newly created product.
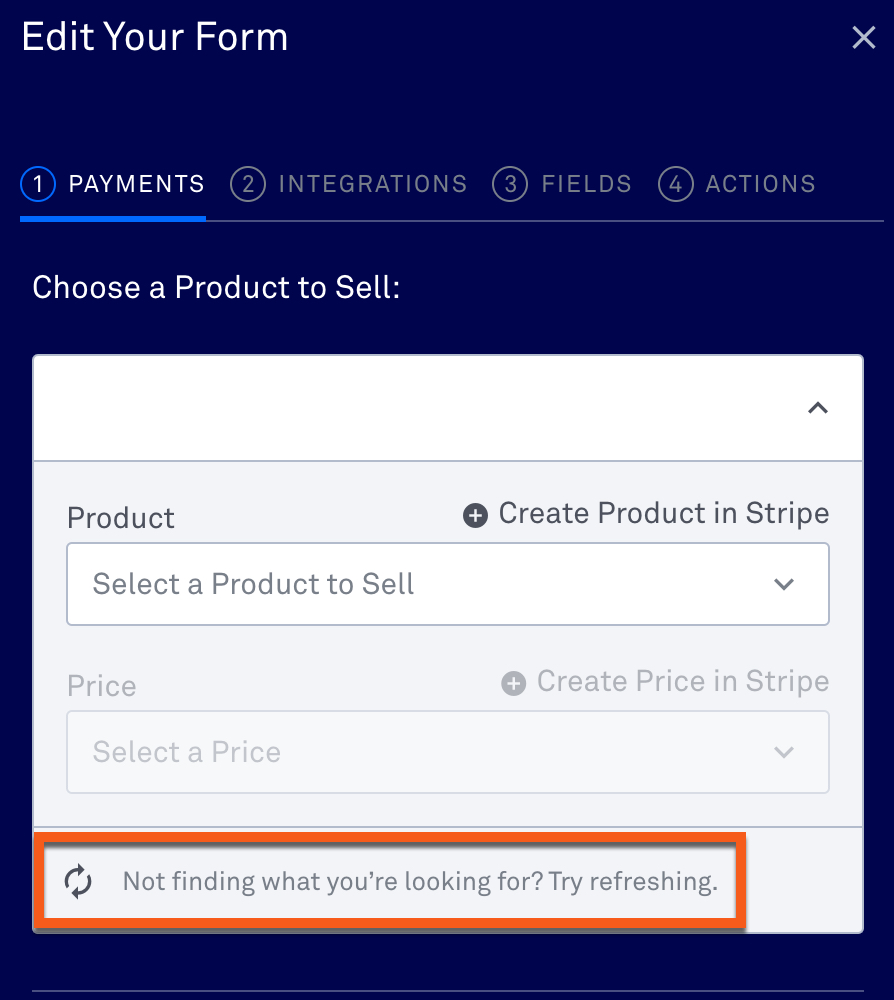
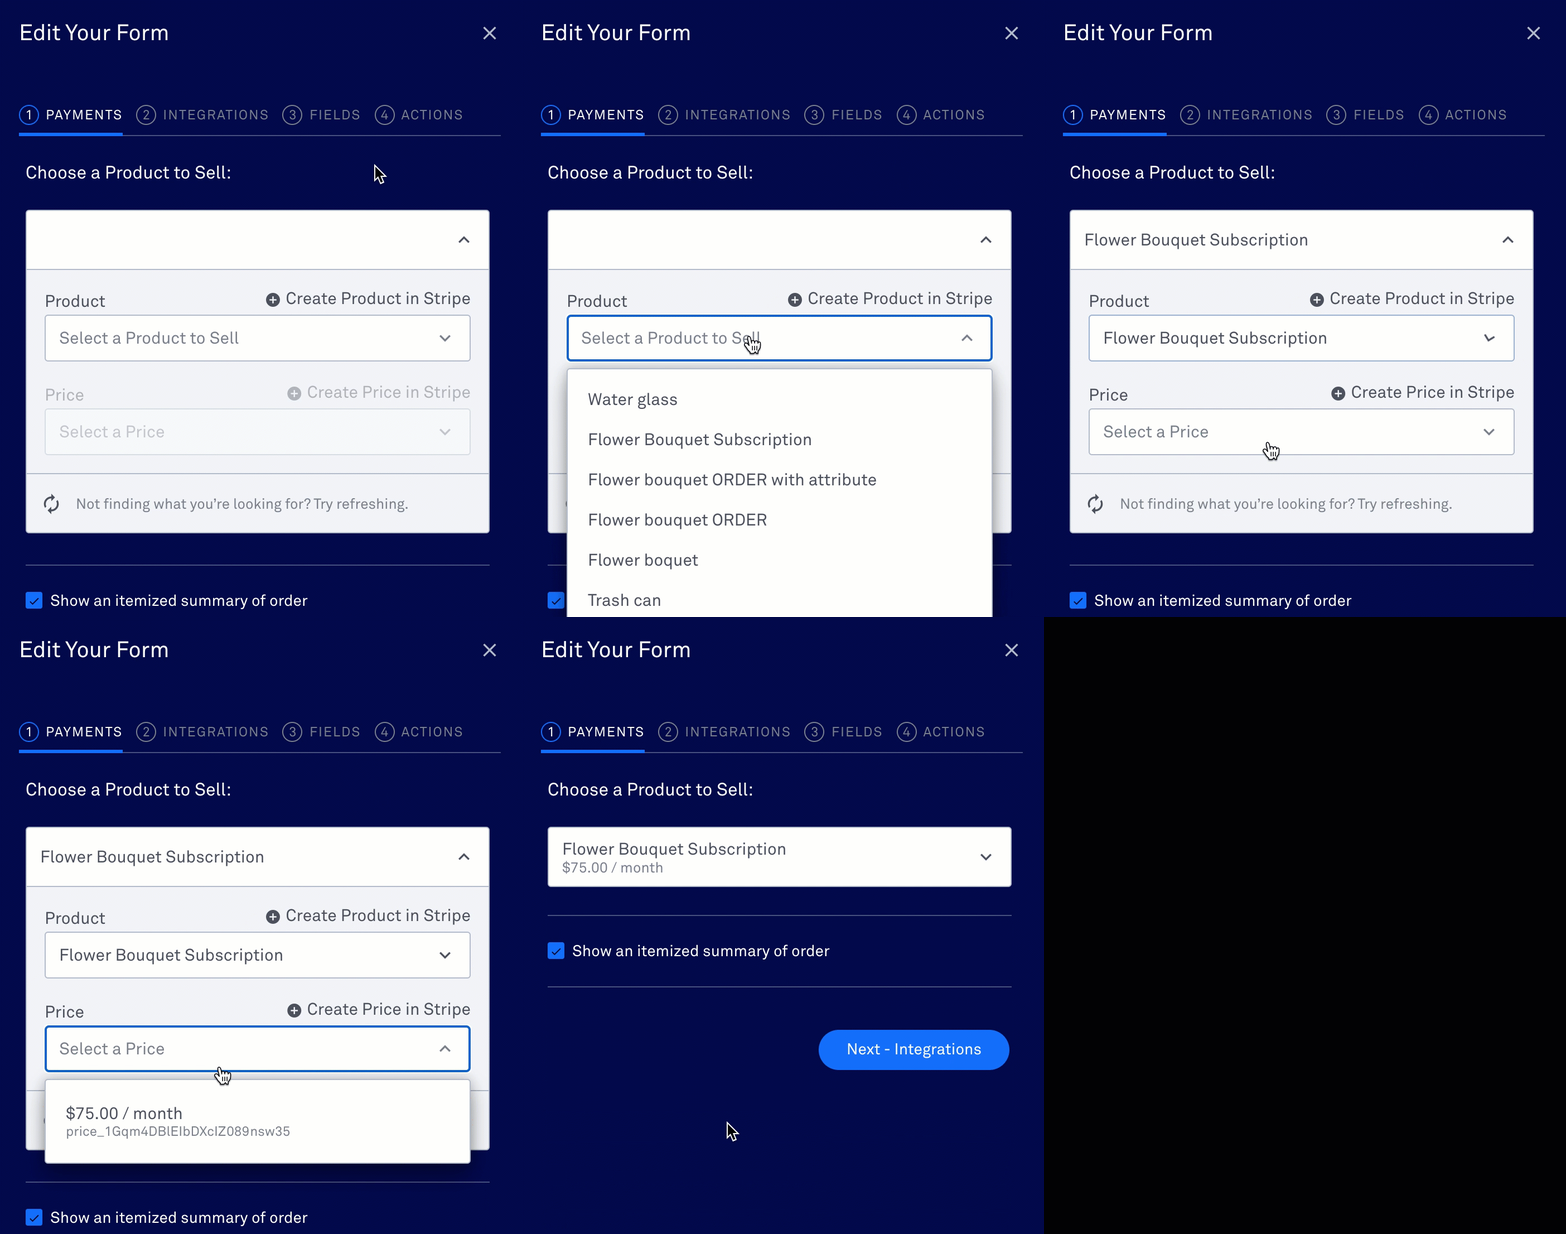
Once you’ve placed a checkout widget on your page and connected your Stripe account, you’ll select your recurring/subscription product from the drop-down menu.
After selecting your recurring product, select the recurring price you set in Stripe for that product, noted by the amount/[billing cycle] (i.e. $5/month).
Recurring product purchase follow-up
When a visitor opts in to your recurring product via Leadpages, they will receive a transactional confirmation email from Leadpages with a link to manage their subscription.
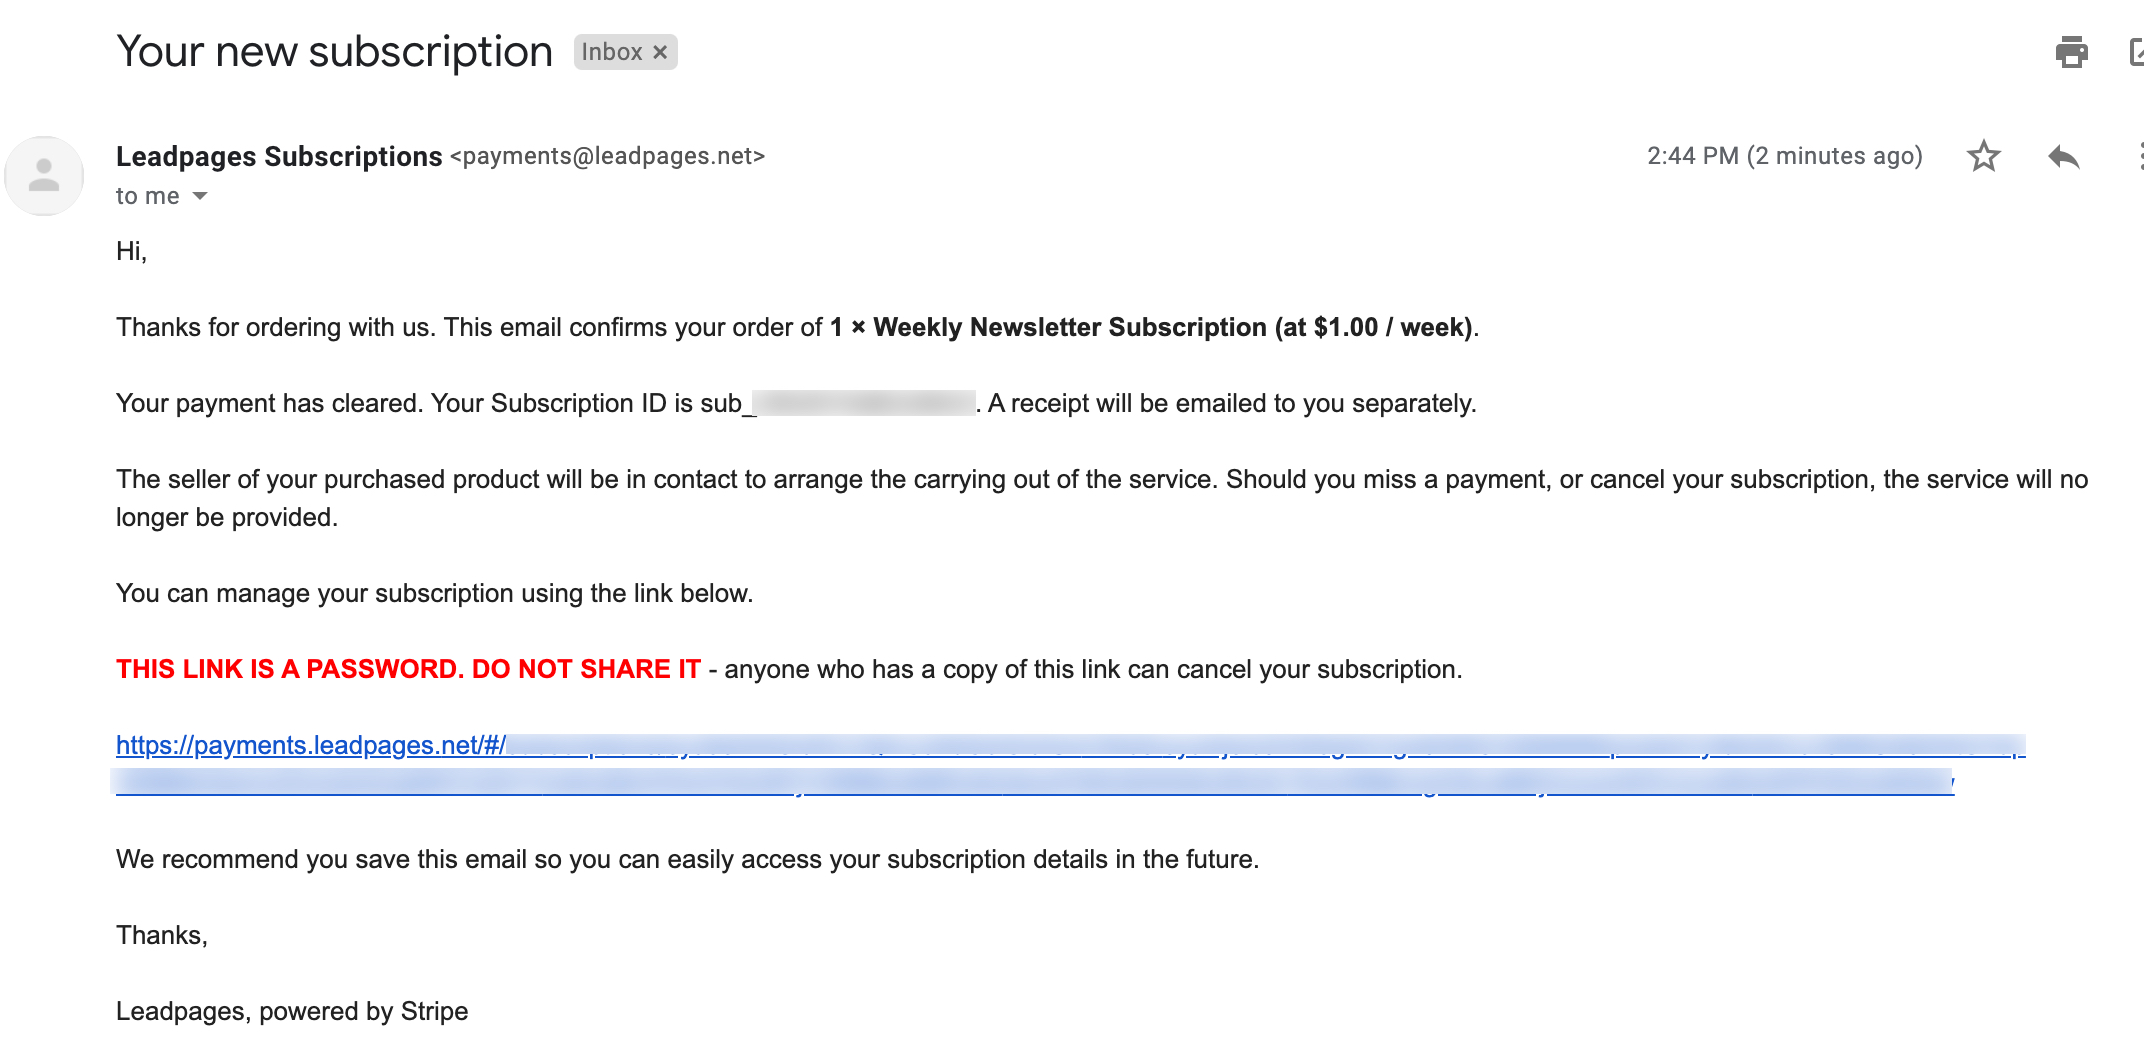
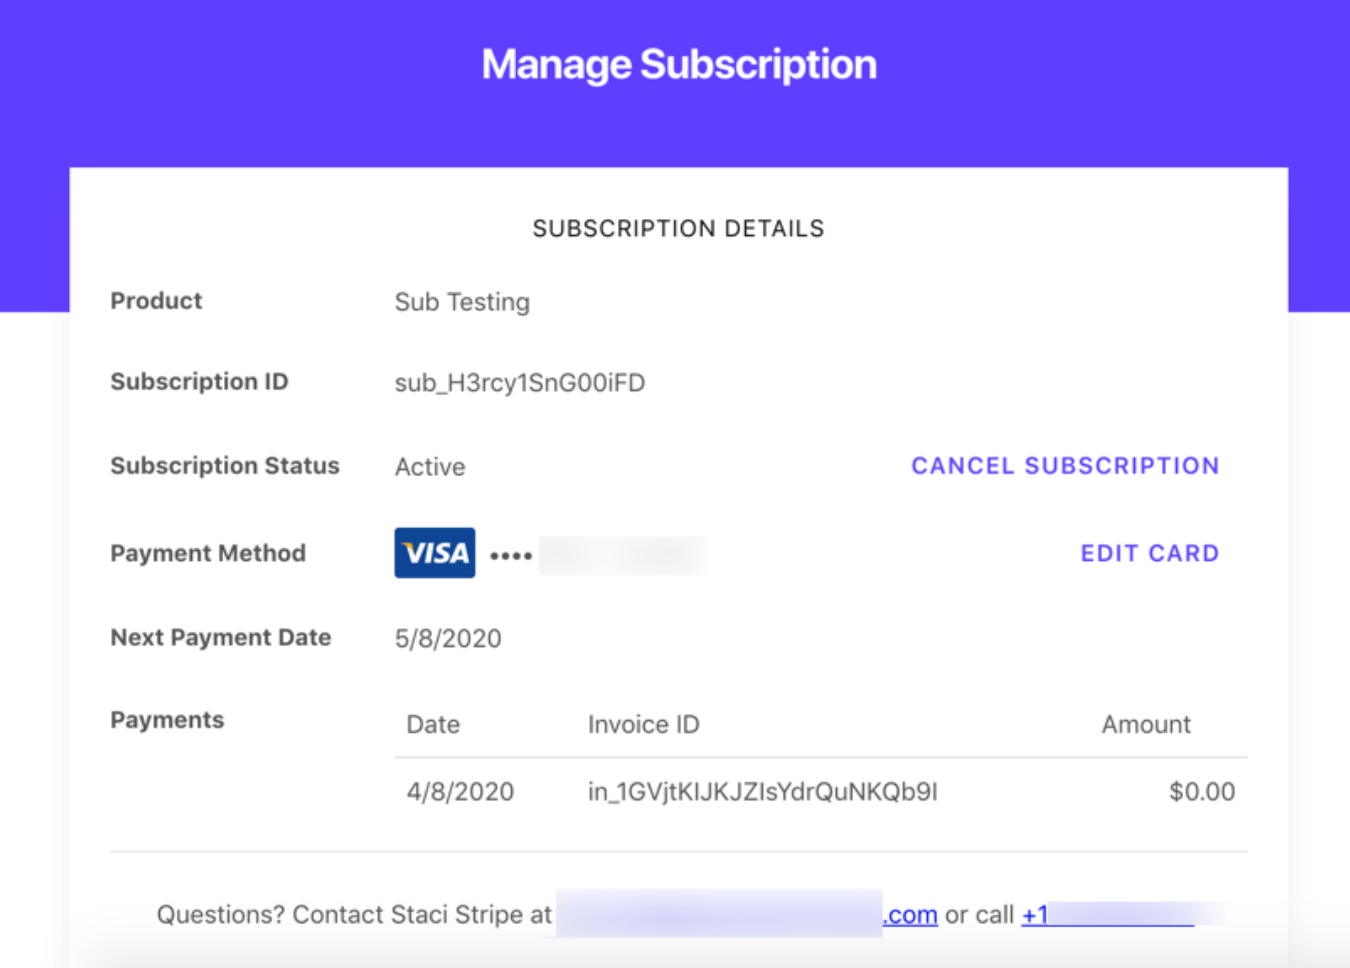
That unique link is where your customers can update their card used for your subscription service as well as cancel their subscription if they choose.
If you would like to send a customized receipt to your customers, you can do so within Stripe here.
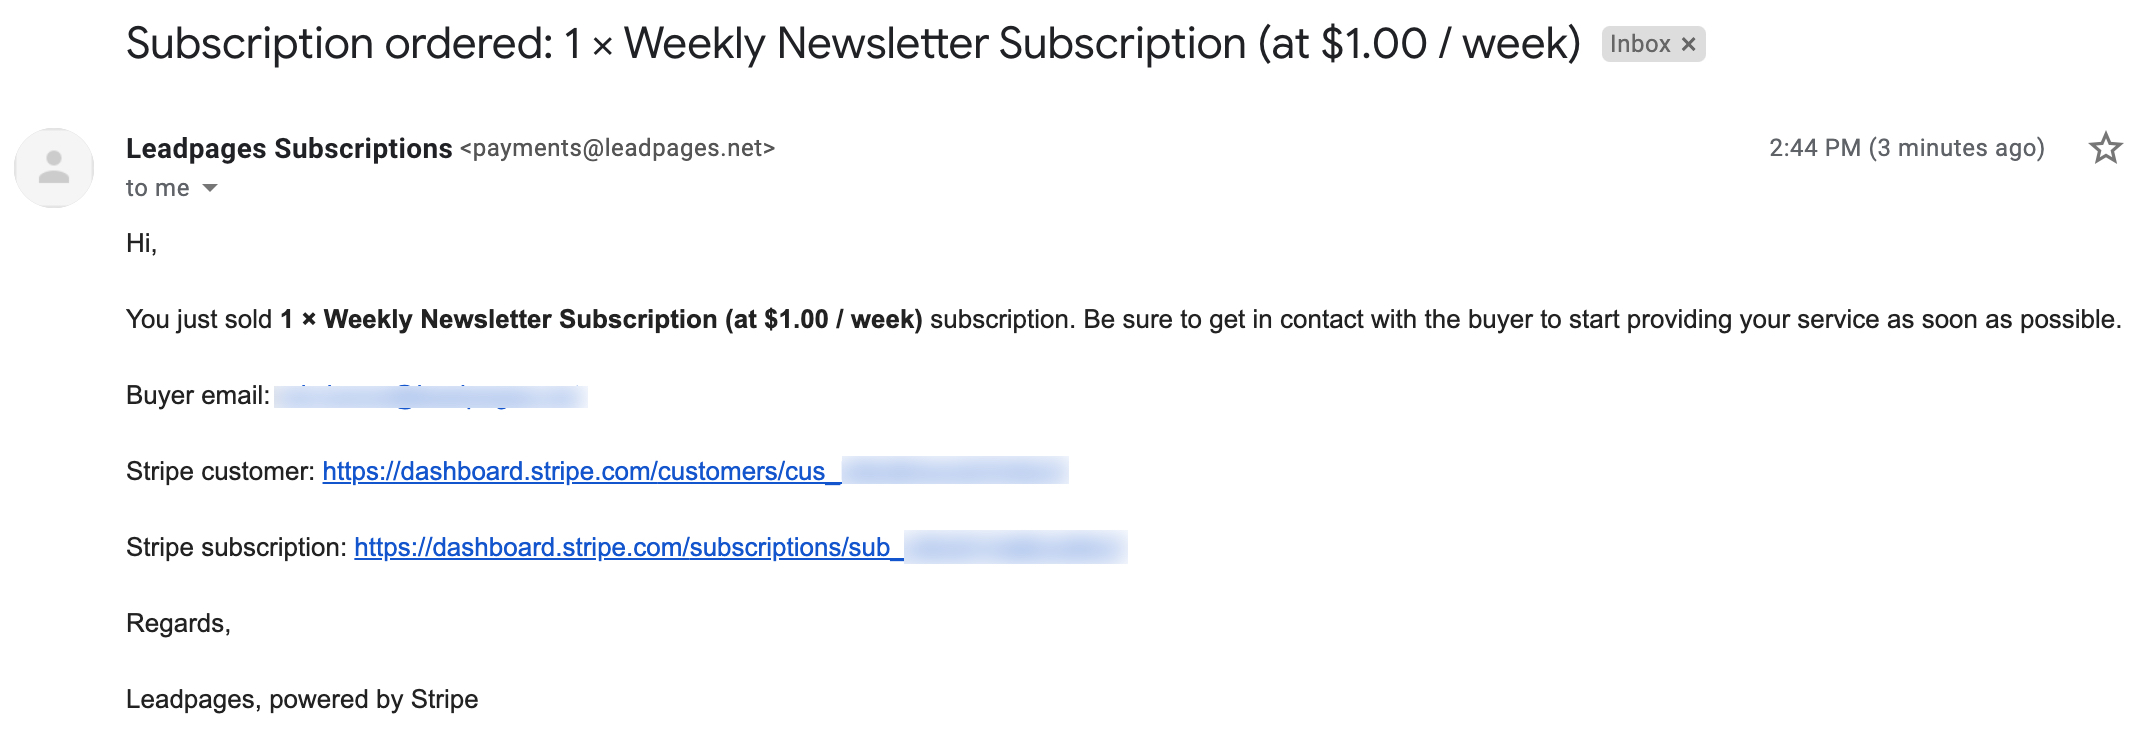
As the seller of the subscription, you will receive a transactional confirmation email for each subscription ordered with the buyer’s email address, a link to that customer in your Stripe account, and a link to their subscription in Stripe.
Add an order bump
Whether you're selling a one-time or recurring product, you can add a single one-time order bump to the same checkout widget.
After selecting your main product and price, toggle on Order Bump.
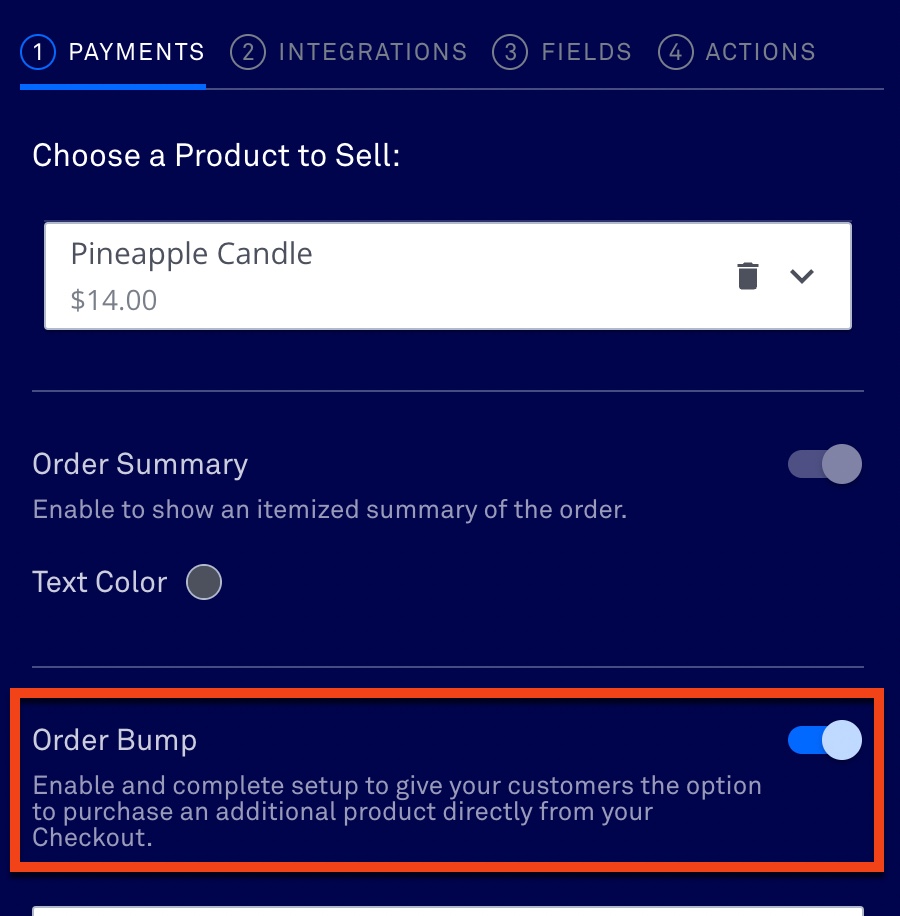
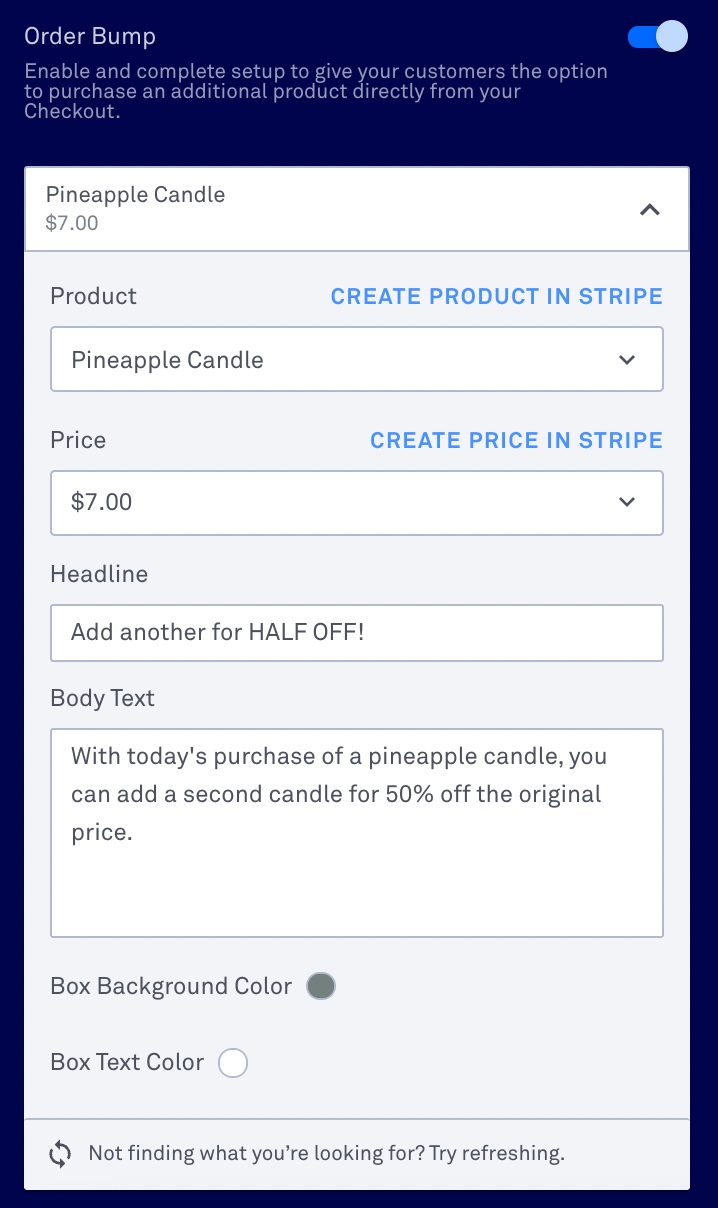
You can then select or create a single one-time product to sell as an add-on to your original product. You may also select the same product but for a different price. For example, you may add a secondary price for the same product as your original as an incentive for them to buy two like in the screenshot below.
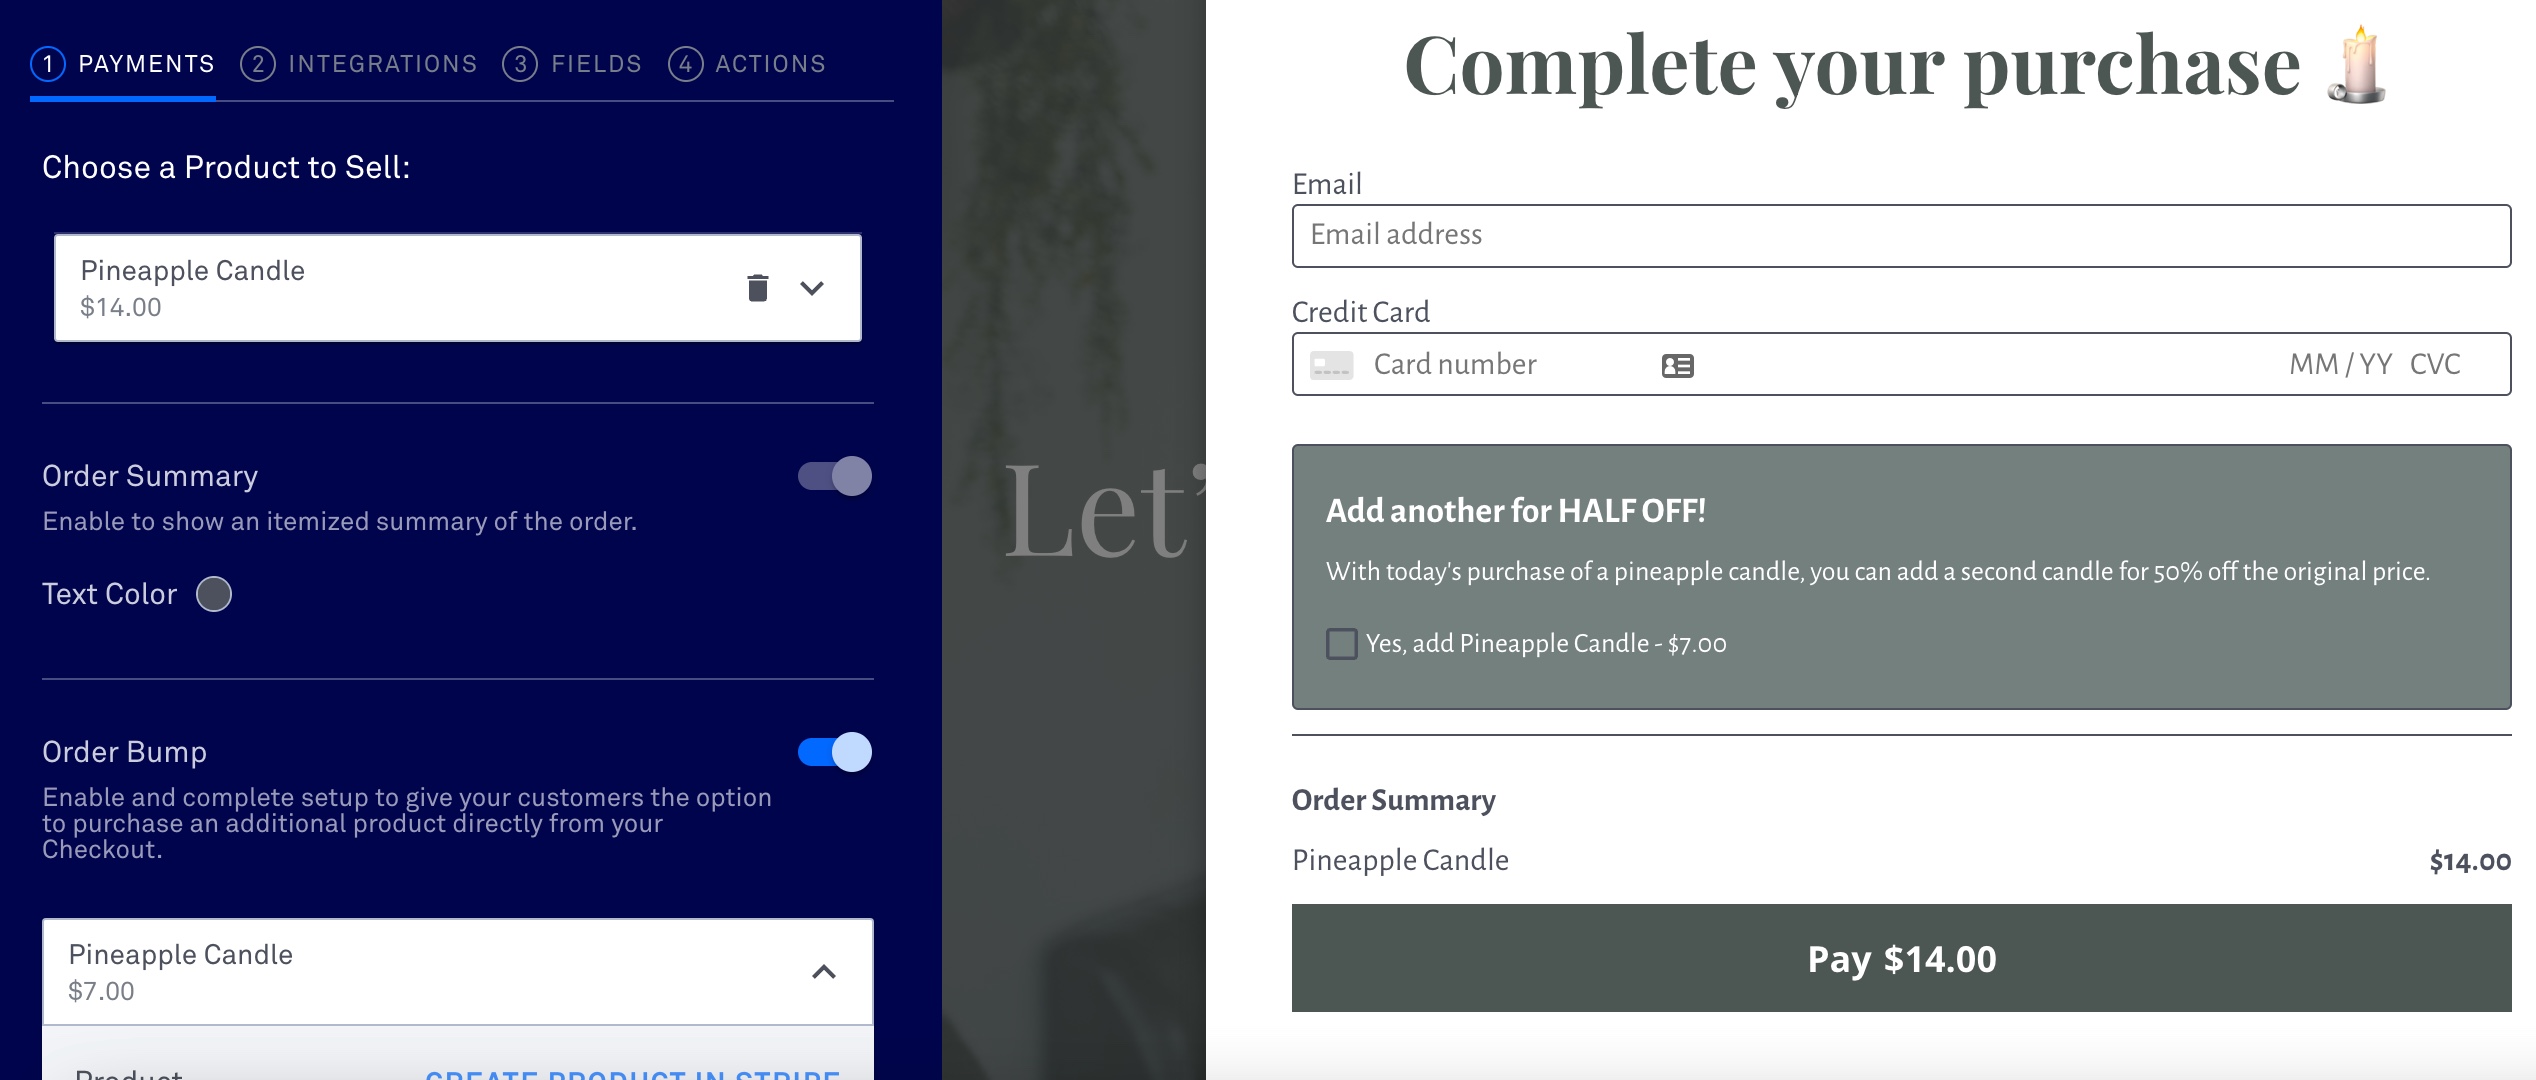
After selecting a product and price, you can add a headline to your order bump box as well as a description of the order bump. You can set a different box background and text color than the rest of your pop-up so that your order bump stands out as well.
Test your Checkout
Not to be confused with Stripe's in-app testing mode, to test the purchase of a product on your page:
- Set your product to $0.00 in Stripe.
- Open your Checkout in the Leadpages builder and refresh ⟳ your Stripe products.
- Update your page at the top-right corner of the builder.
- Visit the page and purchase your product.
After you've finished testing and are set to start selling to your page visitors, make sure to follow these steps to get your product set back to the right price.
Shipping fields
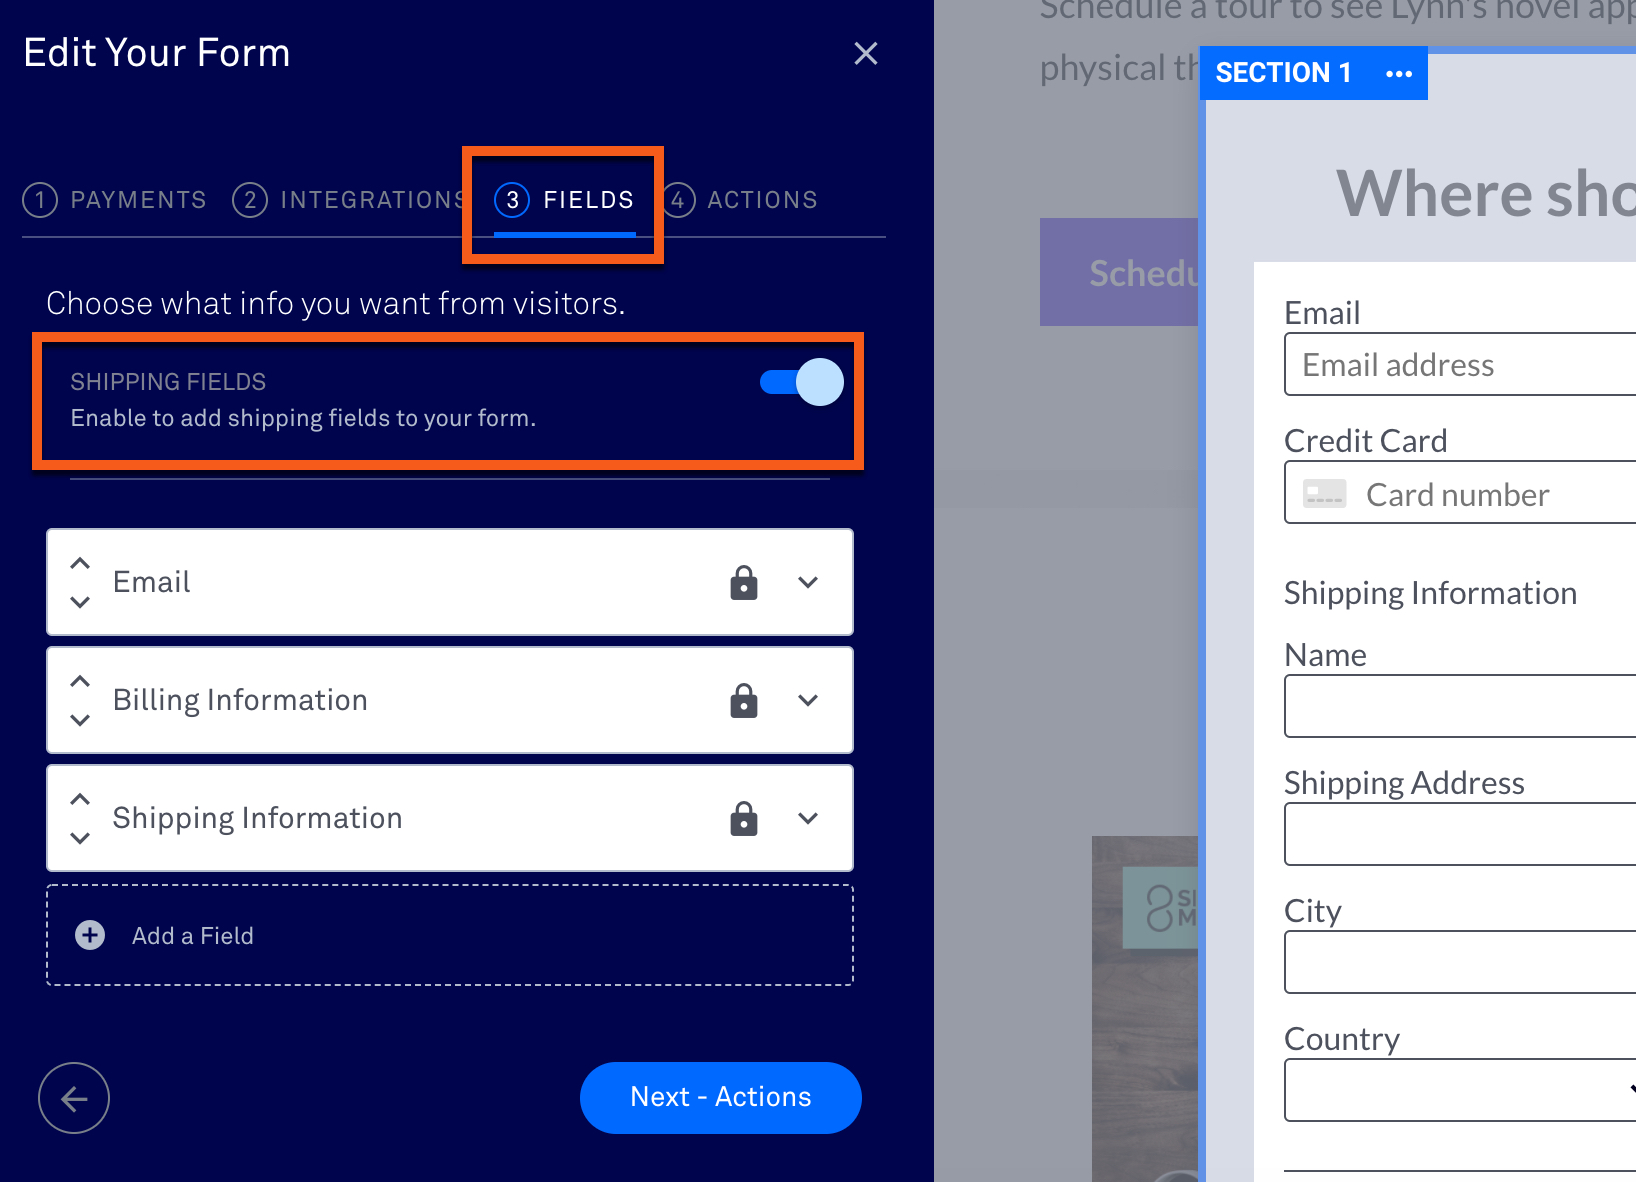
Products default as non-shippable in Stripe. However, if you'd like to add shippable fields, follow the steps below if you have a product that requires shipping fields.
Add shipping fields
- Navigate to ③FIELDS in your checkout widget form settings in Leadpages.
- Toggle "Shipping Fields" on.
All active products will appear in Leadpages—if you don’t see your product listed, try clicking the refresh button and make sure your product is set to “active” in Stripe.
If you’d like to display information about your product on your form, be sure to toggle the switch next to “Add an itemized summary on your form”.
Creating an upsell
You can advocate for further earnings from those who submit your first Checkout with a thank you page that includes another Checkout. On your thank you page's Checkout, you could include an upsell or bonus item for them to purchase.
Additional form options
Add an integration
Besides processing transactions, you can use Checkouts to collect other information about your customers—just like you can with any other form. To do so, navigate to the “Integrations” tab in a Checkout’s settings sidebar. Then, add your email service provider, webinar service, or other integrations.
For a full guide on how to configure your form’s integrations, check out: Connect Integrations.
Customize fields
Checkouts collect the following required fields:
- Email Address (used for email receipts)
- Card Number
- Expiration Date
- CVC/CVV
- Billing ZIP Code
To ensure that you can collect payments through Stripe, these fields are not customizable.
You can add an integration (such as your email service provider) to collect additional information from your customers. Your customers’ email address will get sent to Stripe and any other integrations. However, other custom fields (such as name, phone number, etc.) will only get sent to additional integrations, not Stripe.
Customize a Checkout’s appearance
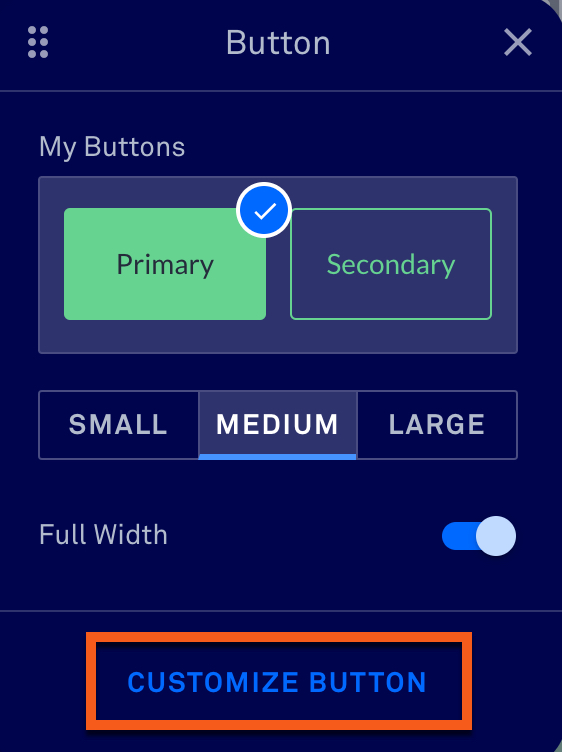
You can customize your buy button’s color, style, and hover state just like a regular form widget. It will automatically display “Pay X.XX.” The “Pay” text cannot be edited but the widget language settings allow you to translate that text to a different language. The price will always reflect information from Stripe and therefore also cannot be edited.
After purchase
Deliver your product
To deliver a single one-time digital product, accounts made prior to January 10th, 2025, will have the option to use our Lead Magnet Delivery System. You can also send a digital product via an email from your integration service, added to your checkout form (especially useful for recurring subscription digital products).
To deliver a shippable physical product, you will need to manually send the item to the purchaser via the information that Leadpages has sent to your Stripe account.
To deliver an order bump product, digital or physical, you will need to manually send the purchaser your product. There is no way to send an order bump product using lead magnets created in Leadpages, nor is there a way to notify your integration service of an order bump purchase at this time.
View invoices
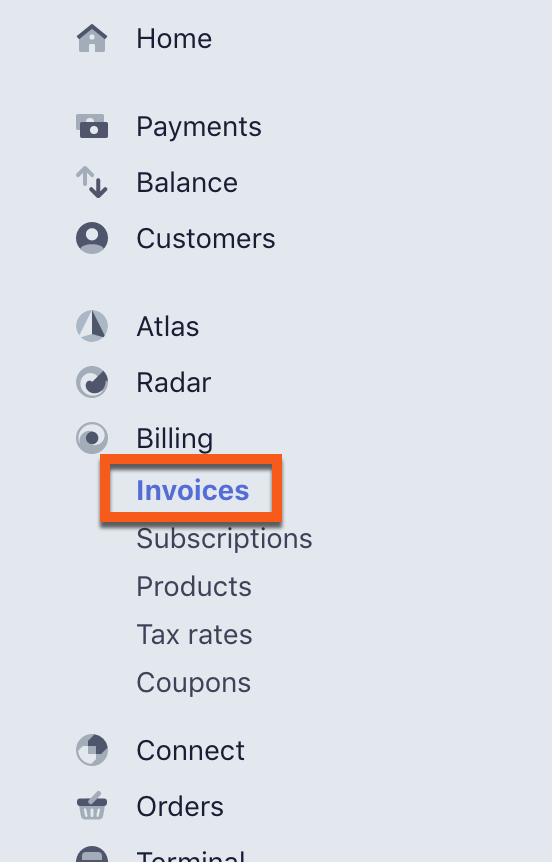
In your Stripe account, any purchases made via a Leadpages checkout widget will be recorded under Billing, then Invoices.
Email receipts
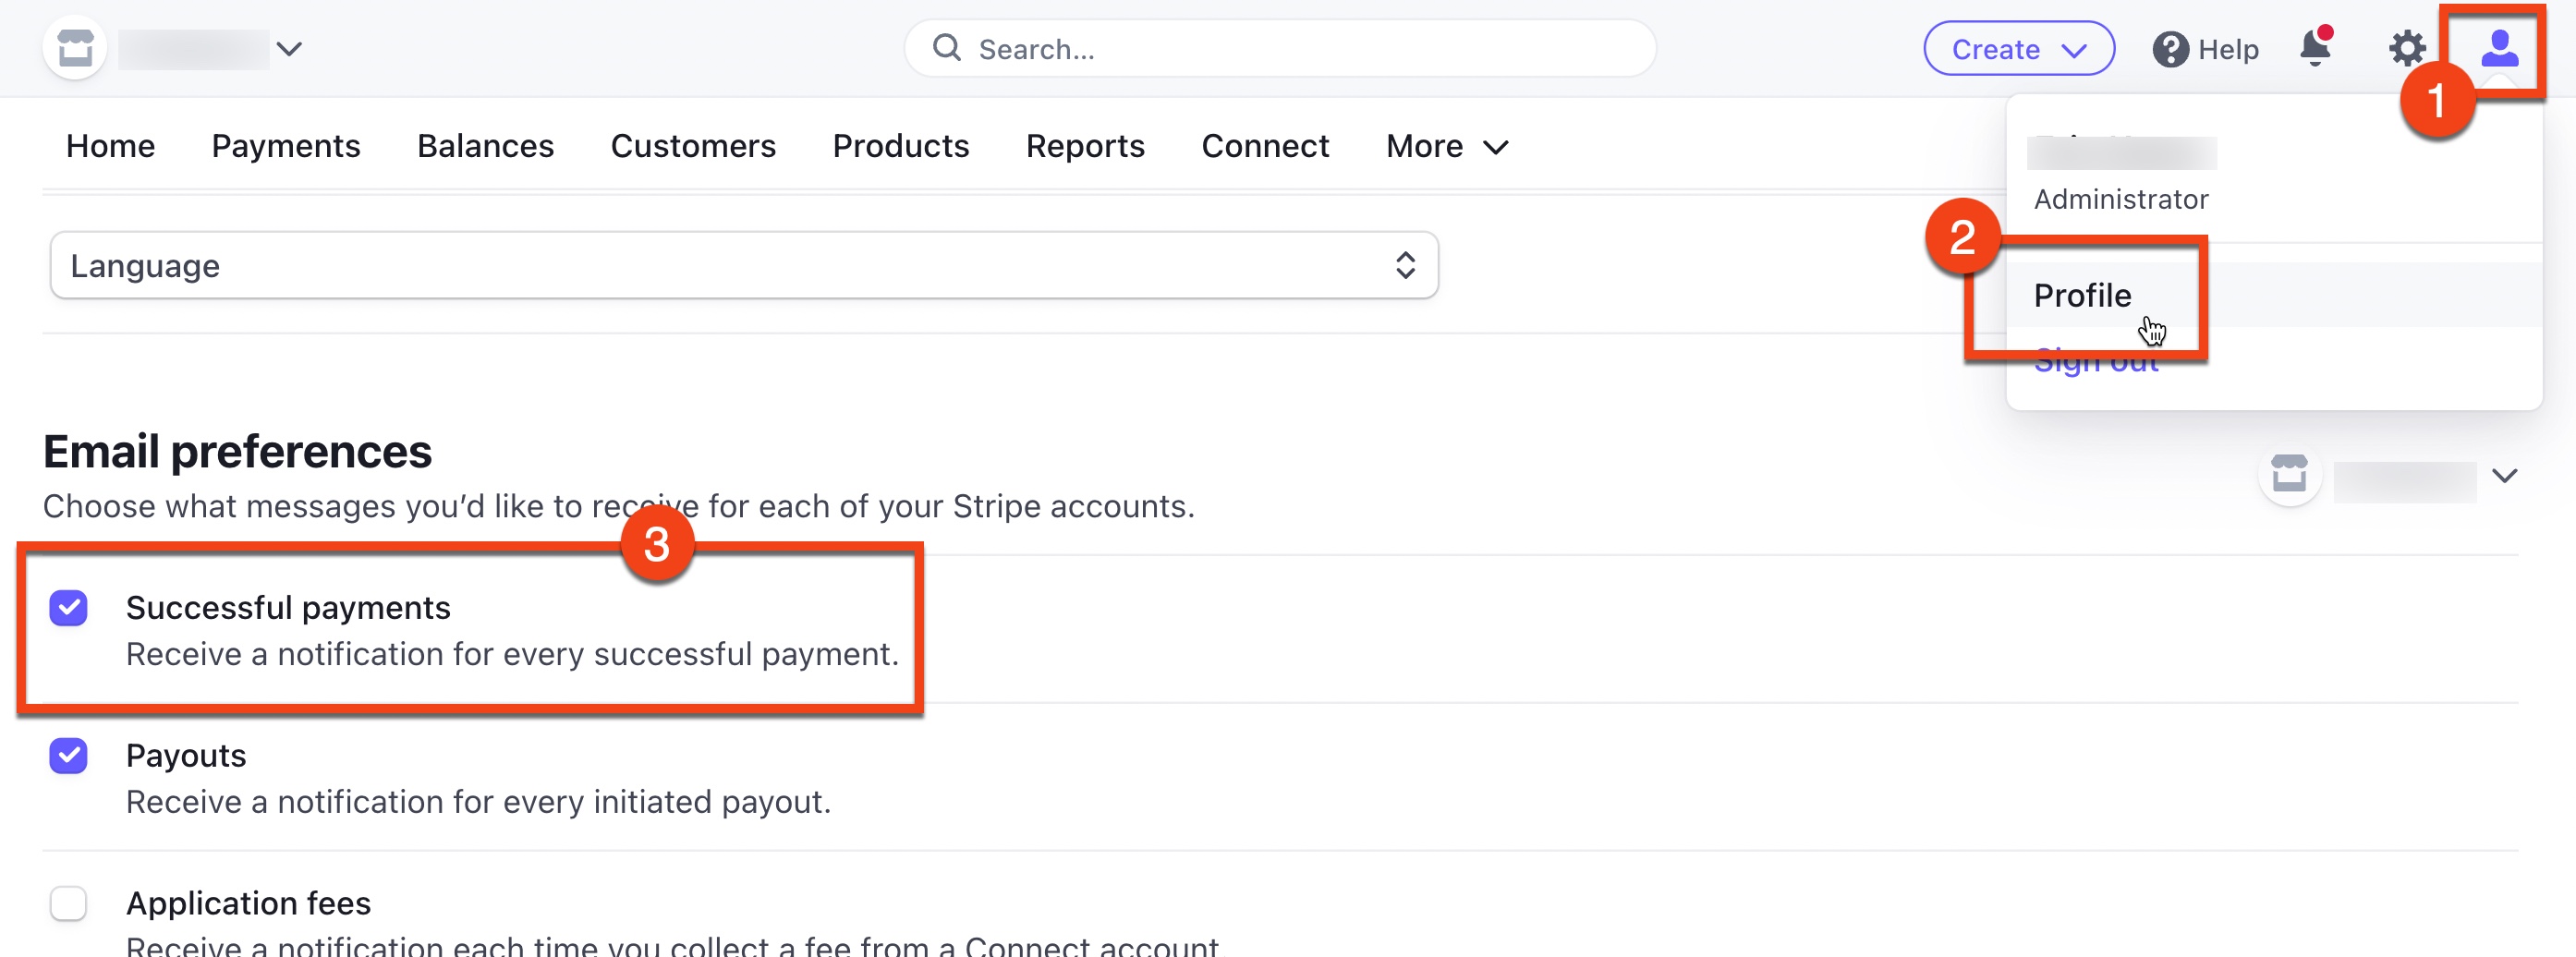
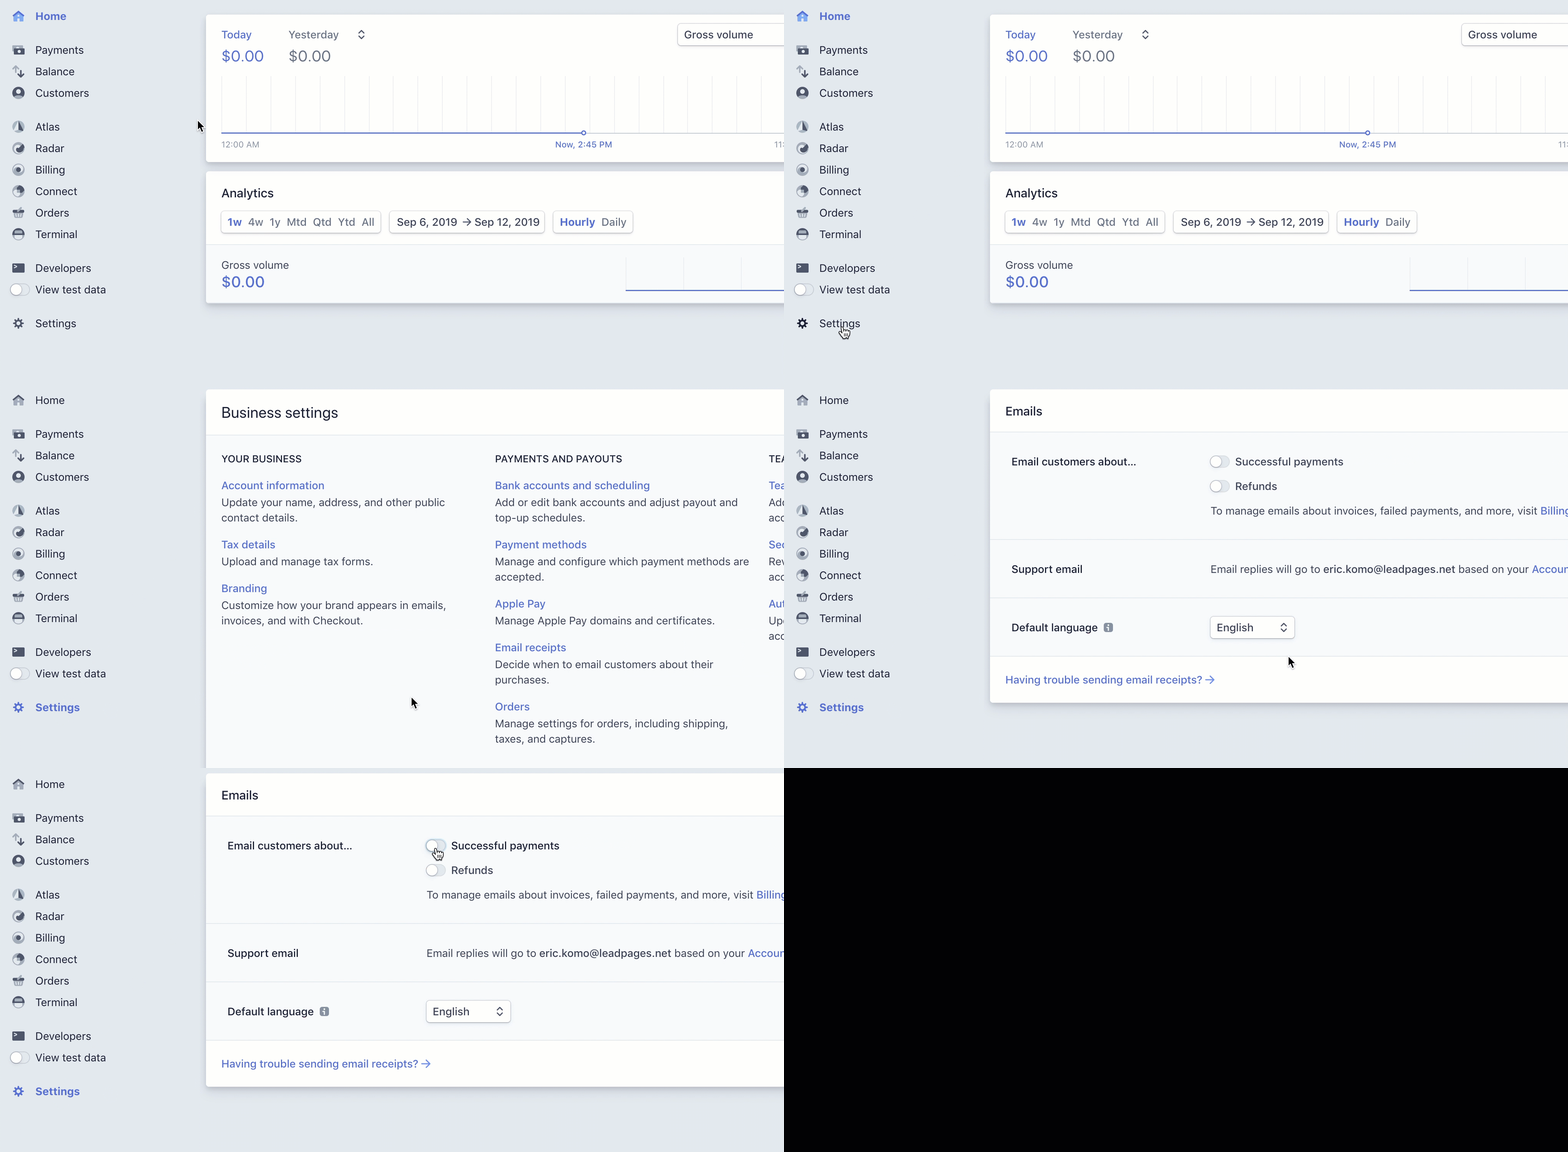
To send email receipts to those who have purchased your product, navigate to your Settings in your Stripe account, then Email receipts and toggle "Successful payments" ON.
Customization and styling details
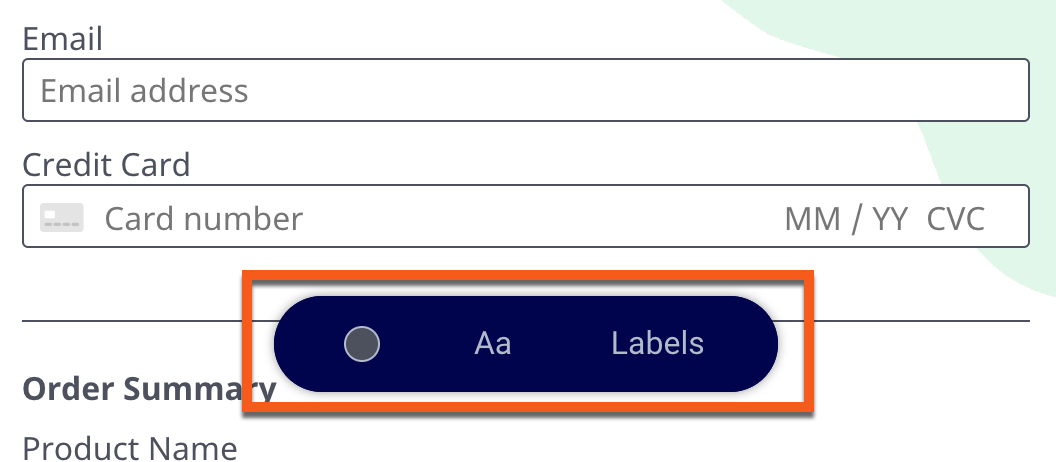
You can adjust the font, size, color and adjust the label (inside or outside the field) under the menu by clicking on any of your form fields, as seen here:
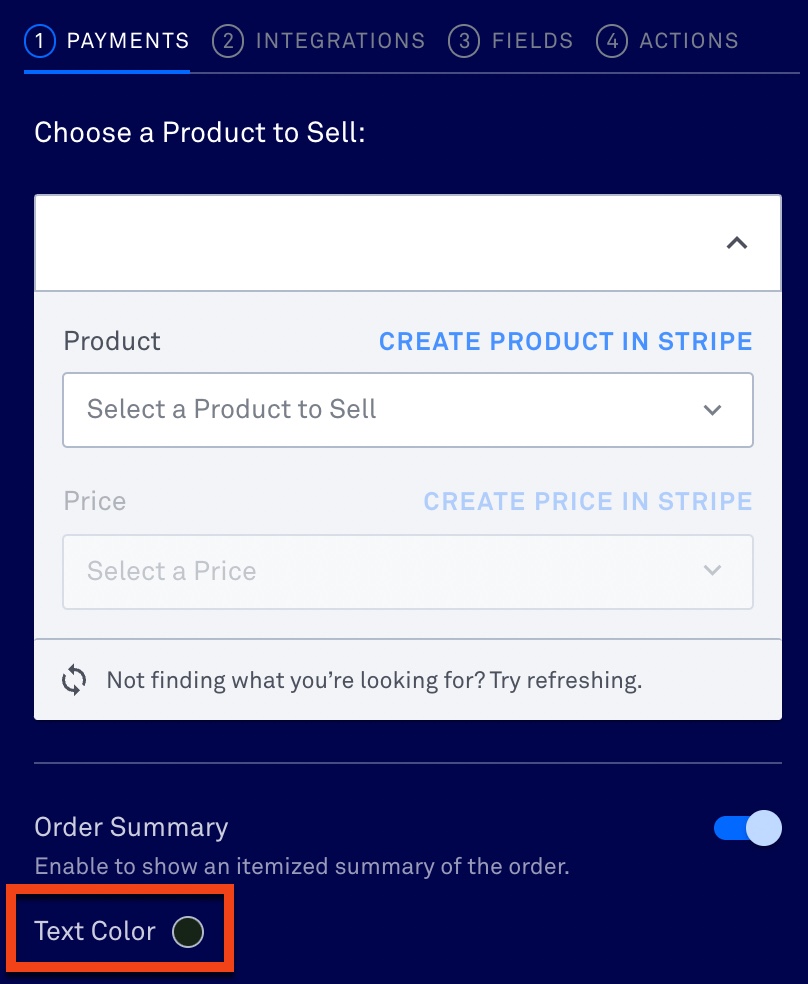
If you have included the order summary on your checkout widget, you can edit the order summary text color within the Payments tab of the widget's form settings.
You can also adjust the style, text and color of the pay button by clicking on it, then select Customize Button, as seen here:
Frequently asked questions
For quick answers on everything from product setup to form customization, check out: Checkouts: Frequently Asked Questions.
Need more help?
You can always get in touch with our support team—just click Support in your Leadpages navigation menu, or submit a ticket ↗
