
A custom domain lets you publish your pages, sites, and blogs on your own web address (like yourbusiness.com or promo.yourbusiness.com) instead of a Leadpages address. Using your own domain builds trust with visitors and can help with SEO and ad quality scores.
You control the DNS for your domain, and Leadpages issues and renews the SSL certificate for you automatically.
Root domain or subdomain?
- Root domain: The main version of your domain, like
yourbusiness.com. - Subdomain: A prefix added to your domain, like
shop.yourbusiness.comorpages.yourbusiness.com.
Already have a website on your domain? Connect a subdomain instead of your root domain. If you connect the root domain, your Leadpages content will replace your existing site at that address. Your old site won't be deleted, but visitors won't be able to reach it. With a subdomain, your existing site stays exactly where it is.
The Domains page
To find your domains, go to Manage > Domains in the sidebar. This page lists every address your pages can be published at, split into two sections.
Custom Domains
These are domains you own and connect to Leadpages. At the top of the section you'll see how many domains you've used out of your plan's limit, plus two buttons:
- Buy a Domain: Register a new domain. Your first custom domain is free on Grow, Optimize, and Scale plans. See Free Custom Domain Offer ↗ for details.
- Connect Domain: Connect a domain you already own.
Each domain in the list shows:
| Column | What it shows |
|---|---|
| Domain | The domain or subdomain you connected. |
| Homepage | The page, site, or blog that shows when someone visits the domain. |
| Status | Connected if the domain is working, or Not connected if something still needs to be set up. |
| Added | The date you added the domain. |
| Actions | Buttons to change what the domain points to, finish setup, or delete the domain. See Managing your domains below. |
Leadpages Domains
These are free addresses that come with your workspace, like yourname.lpcontent.net. They're already live with SSL, so there's nothing to set up with a domain provider. You can choose what each one shows and where visitors land if they hit a broken link.
Connect your domain
Step 1: Add your domain
- Go to Manage > Domains.
- Click Connect Domain.
- Under Domain, enter your root domain (like
yourbusiness.com) or a subdomain (likepages.yourbusiness.com). - Under Homepage, choose Page, Site, or Blog, then pick what should show when someone visits the domain. This is optional. You can set it now or later.
- Under Custom 404 page, choose a page to show visitors if they land on a broken link, or leave it as No custom 404 page. This is also optional.
- Click Add & Configure Domain.
Step 2: Connect with your domain provider
Leadpages detects where your domain is registered (for example IONOS, GoDaddy, or Namecheap) and offers to set up your DNS for you.
Click Continue with your provider and log in to your domain provider account. Leadpages adds the DNS records you need automatically, so there's nothing to copy or paste.
Other ways to connect
If you can't log in to your domain provider from here, click Connect a different way. You'll see three options:
| Option | When to use it |
|---|---|
| Set up manually | Enter the DNS records yourself. Useful if your provider account uses social login (like Google sign-in) or Passkey two-factor authentication. |
| Send login link to admin | If you're not the domain owner, email a setup link to whoever manages the domain so they can finish the connection. |
| Change provider | If Leadpages detected the wrong domain provider, pick the correct one. |
Setting up DNS records manually
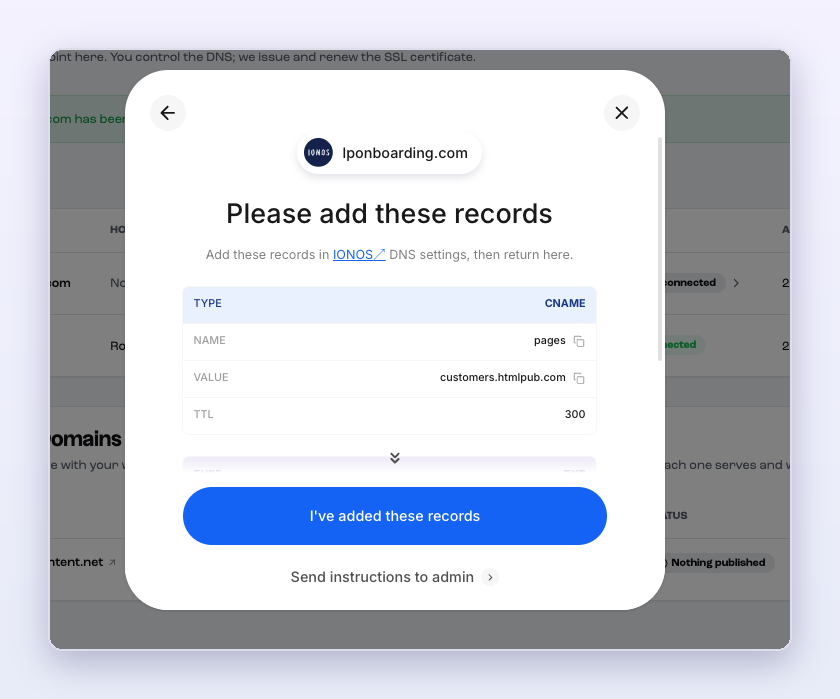
If you choose Set up manually, Leadpages shows the exact records to add in your domain provider's DNS settings. Each record lists its Type, Name, Value, and TTL. Use the copy icons to copy each value so there are no typos. Scroll down in the window to see every record you need to add.
For example, a subdomain like pages.yourbusiness.com uses a CNAME record with the name pages and the value customers.htmlpub.com. You'll also be asked to add a TXT record.
Once you've added the records at your provider, come back and click I've added these records. If someone else manages your DNS, click Send instructions to admin instead.
Manual DNS records
- A record #1 to create
- Host (also called: Name, Hostname, @):
@ - Value (also called: Points to, IP Address):
162.159.142.254
- Host (also called: Name, Hostname, @):
- A record #2 to create
- Host (also called: Name, Hostname, @):
@ - Value (also called: Points to, IP Address):
172.66.2.250
- Host (also called: Name, Hostname, @):
- CNAME record to create
- Host (also called: Name, Hostname, @):
www(or your sub-domain of choice) - Value (also called: Points to, IP Address):
customers.htmlpub.com
- Host (also called: Name, Hostname, @):
- TXT record to create
- Host (also called: Name, Hostname, @):
_cf-custom-hostnamefor a root domain, or_cf-custom-hostname.[subdomain]for a subdomain.
(For example,_cf-custom-hostname.wwwforwww.yourdomain.com, or_cf-custom-hostname.salesforsales.yourdomain.com) - Value (also called: Points to, IP Address): This value will always be unique. Copy and paste the value provided in your account. If you have trouble locating this value, please reach out to Support for assistance.
- Host (also called: Name, Hostname, @):
Tip: Always copy the records shown in your own setup window. They're specific to your domain, so don't reuse records from another domain or another article.
Note: DNS changes can take some time to take effect. Your domain shows Connected once everything is verified, and your SSL certificate is issued automatically. It can take up to 48 hours, but often domains connect far sooner than that.
Managing your domains
Each domain in your Custom Domains list has buttons under Actions.
| Button | What it does |
|---|---|
| Two arrows | Change which page, site, or blog the domain points to, and set a custom 404 page. |
| Configure | Reopens the connection window so you can finish connecting a domain that isn't connected yet. Only shows for domains that aren't connected. |
| Trash can | Deletes the domain from your account. |
Change what your domain points to
- Click the two arrows icon next to the domain.
- Choose Page, Site, or Blog.
- Under Homepage, pick what should show when someone visits the domain.
- Under Custom 404, pick a page for broken links, or leave it as No custom 404 page.
- Click Save.
Finish connecting a domain
If a domain shows Not connected, click on the domain to expand its details and see why it isn't connected yet.
To pick up where you left off, click Configure. This reopens the connection window so you can connect with your domain provider, set up your records manually, or send the setup to your admin.
Delete a domain
Click the trash can icon next to the domain.
Note: Deleting a domain from Leadpages doesn't cancel or delete it at your domain provider or remove the DNS records. You'll still own the domain and will need to manage the DNS records with your domain provider.
Troubleshooting
My domain says "Not connected".
Click the domain to expand its details and see what's missing. Then click Configure to finish the setup. If you set up your records manually, double-check that each one matches exactly what's shown in your setup window. If you need further assistance, please reach out to our Support team.
My domain isn't loading.
Make sure the domain shows Connected and has a homepage set. If the Homepage column says No homepage set, click the two arrows icon and choose a page, site, or blog.
I can't log in to my domain provider from Leadpages.
This can happen if your provider account uses social login or Passkey two-factor authentication. Click Connect a different way, then choose Set up manually.
I don't manage my company's domain.
Click Connect a different way, then choose Send login link to admin to email the setup to whoever manages your domain.
Leadpages detected the wrong domain provider.
Click Connect a different way, then choose Change provider and pick the correct one.
Frequently asked questions
Do I need my own domain to publish?
No. Every workspace comes with a free Leadpages Domain on lpcontent.net that's already live. You can publish there and connect your own domain later. This is a staging URL, and generally, it's best to connect a custom domain that's more on brand with your own content. That is better for SEO.
Can I connect a domain if I already have a website on it?
Yes, but connect a subdomain (like pages.yourbusiness.com) so your existing site isn't replaced.
Can I point my domain at a site or blog instead of a single page?
Yes. When you connect your domain, or anytime afterward with the two arrows icon, choose Page, Site, or Blog and pick what to show.
What is a custom 404 page?
It's the page visitors see if they go to an address on your domain that doesn't exist. Choose one of your pages to keep those visitors on your brand instead of seeing an error.
Do I need to set up SSL?
No. Leadpages issues and renews the SSL certificate for every connected domain automatically.
How many domains can I connect?
It depends on your plan. The Domains page shows how many you've used out of your plan's limit.
Can I buy a domain through Leadpages?
Yes. Click Buy a Domain on the Domains page. Your first custom domain is free on Grow, Optimize, and Scale plans. See Free Custom Domain Offer ↗ for details.
Need more help?
You can always get in touch with our support team—just click Support in your Leadpages navigation menu, or submit a ticket ↗